Building Trust into OS images for Confidential Containers
Containers and OS Images
Confidential Containers using Kata-Containers are launched in a Confidential Virtual Machine (CVM). Those CVMs require a minimal Linux system which will run in our Trusted Execution Environment (TEE) and host the agent side of Kata-Containers (including various auxiliary attestation tools) to launch containers and facilitate secure key releases for a confidential Pod. Integrity of the workload is one of the key pillars for Confidential Computing. Consequently, this implies we also must trust the infrastructure components that host containers on a confidential guest VM, specifically: firmware, rootfs, kernel and kernel cmdline.
For a TEE there are various options to establish this kind of trust. Which option will be used depends on the capabilities and specifics of a TEE. All of them will include various degrees of “measurements” (that is: cryptographic hashes for a blob of data and/or code) to reach the same goal: providing a verifiable statement about the integrity of the OS image. We’ll discuss three viable options; those are not exhaustive
Initial ramdisk
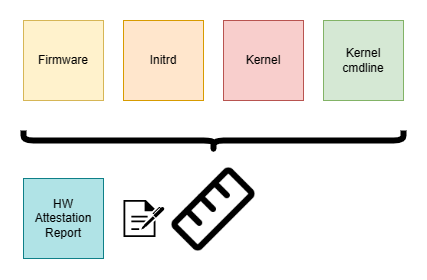
We can opt to not use a rootfs and bundle the required userland components into Linux’ initial ramdisk (initrd), which is loaded by the kernel. Outside a CoCo scenario this facility is used to provide a boot stage in which kernel drivers can be loaded on-demand from a memory-backed (compressed) volume, not having to bundle device drivers for various hardware statically in each vendor kernel. For CoCo VMs, this kind of flexibility is not really required: we do know beforehand the virtualized hardware that our CVM is configured with, and it will require only a limited set of drivers. Due to its static nature, relying solely on an initrd would be impractical for many workloads. For CoCo however, this is a viable option, since the dynamic aspect of its workload is mostly deferred to the container execution. This means we can have the kernel launch a kata-agent as PID 1 directly from an initrd.
This option is appealing for certain CoCo deployments. If we have a Trusted Execution Environment (TEE) that will produce a launch-measurement of the initial RAM state of a CVM, we can use this measurement to gain confidence that our os image is genuine. We can calculate the expected value of a given launch measurement offline and then verify during remote attestation that the actual launch measurement matches our expected value.
Calculating a launch measurement
An expected SEV-SNP launch measurement for Linux direct boot with Qemu can be calculated using trusted artifacts (firmware, kernel & initrd) and a few platform parameters. Please note that the respective kernel/fw components and tools are still being actively developed. The AMDESE/AMDSEV repository provides instructions and pointers to a working set of revisions.
$ sev-snp-measure \
	--mode snp \
	--vcpus=1 \
	--vcpu-type=EPYC-Milan-v1 \
	--kernel=vmlinuz \
	--initrd=initrd.img \
	--append="console=ttyS0" \
	--ovmf OVMF.fd
20f28c1e85c4250c2c061d1997cfc815185cefe756c74b37ea1c81eb8f2e0e3c5c43e58d65e0e792ed2bd04a0720f970
DM Verity
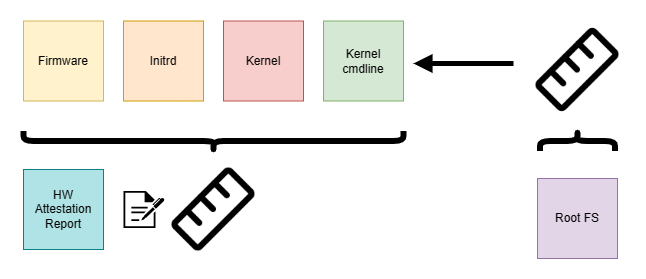
The infrastructure components might outgrow a reasonably sized initrd. We want to limit the initrd to a smaller size, to not spend too much of the guest’s RAM, but leave as much as possible for the container payload. In the worst case we’ll have to spend ~2x the size of the initrd (we also need to keep the compressed initrd in RAM). With an increasing amount of supported TEEs the infrastructure components will inevitably grow, since they need to support various attestation schemes and hardware. Some of those schemes might also have a larger dependency tree, which is unreasonable to statically link or bundle into an initrd. There might be compliance requirements which mandate the use of certain cryptographic libraries that must not be statically compiled. Those considerations might nudge us to a more traditional Linux setup of kernel, initrd and rootfs.
A rootfs can comfortably host the infrastructure components and we can still package support for all kinds of TEE in a single OS image artifact. However, the dependencies for a given TEE can now be loaded dynamically into RAM. For CVMs there is a restriction when it comes to how an OS image is handled: We must prevent the CVM host, storage provider or anyone else outside the TEE from compromising the image to uphold the integrity of a CoCo workload. dm-verity is a kernel technology that prevents changes to a read-only filesystem during runtime. Block-level access is guarded by a hash tree and on unexpected block data the kernel will panic. This protection scheme requires a root hash that needs to be provided when the verity-protected filesystem is mounted. We can provide this root hash through the kernel cmdline or bake it into the initrd. In any case, the TEE has to include the root hash in a launch measurement to provide verifiable integrity guarantees.
Creating a verity volume
DM-Verity volumes feature a hash tree and a root hash in addition to the actual data. The hash tree can be stored on disk next to the verity volume or as a local file. We’ll store the hash-tree as file for brevity and write a string CoCo into a file /coco on the formatted volume:
$ dd if=/dev/zero of=rootfs.raw bs=1M count=100
$ DEVICE="$(sudo losetup --show -f rootfs.raw)"
$ sudo cfdisk "$DEVICE"
# create 1 partition
$ sudo mkfs.ext4 "$DEVICE"
...
$ sudo mount "$DEVICE" /mnt
$ echo "CoCo" | sudo tee /mnt/coco
CoCo
$ sudo umount /mnt
$ sudo veritysetup format "$DEVICE" ./hash-tree
VERITY header information for ./hash-tree
UUID:                   91bbc990-f0df-48c0-b8f0-1b996cf0c3cf
Hash type:              1
Data blocks:            25600
Data block size:        4096
Hash block size:        4096
Hash algorithm:         sha256
Salt:                   cef7ea72e3487f4f8d26df8731df561f64e03236fa494dc0ae87fe0f07a4825b
Root hash:              ad86ff8492be2ee204cb54d70c84412c2dc89cefd34e263184f4e00295a412f3
$ export ROOT_HASH=ad86ff8492be2ee204cb54d70c84412c2dc89cefd34e263184f4e00295a412f3
Corrupting the image
Now we toggle a bit on the raw image (CoCo => DoCo in /coco). If the image is attached as a block device via dm-verity, there will be IO errors and respective entries in the kernel log, once we attempt to read the file.
$ hexdump -C rootfs.raw | grep CoCo
06000000  43 6f 43 6f 0a 00 00 00  00 00 00 00 00 00 00 00  |CoCo............|
$ printf '\x44' | dd of=rootfs.raw bs=1 seek="$((16#06000000))" count=1 conv=notrunc
$ hexdump -C rootfs.raw | grep DoCo
06000000  44 6f 43 6f 0a 00 00 00  00 00 00 00 00 00 00 00  |DoCo............|
$ sudo veritysetup open "$DEVICE" rootfs ./hash-tree "$ROOT_HASH"
$ sudo mount /dev/mapper/rootfs /mnt
$ cat /mnt/coco
cat: /mnt/coco: Input/output error
$ dmesg | tail -1
[194754.361797] device-mapper: verity: 7:0: data block 24576 is corrupted
vTPM
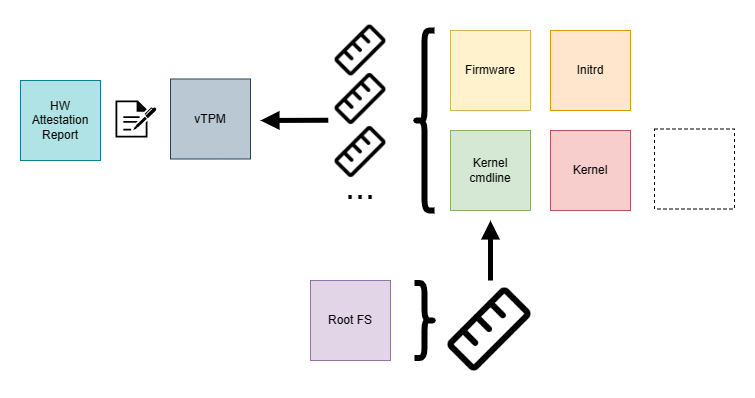
There are setups in which a launch measurement of the TEEs will not cover the kernel and/or initrd. An example of such a TEE is Azure’s Confidential VM offering (L1 VMs provided by hypervisor running on a physical host). Those CVMs can host Confidential Containers in a CoCo Peerpod setup. The hardware evidence, which is attesting encrypted RAM and CPU registers is exclusively fetched during an early boot phase. Only in later stages the kernel and initrd are loaded from an OS image and hence the launch measurement will not cover the CoCo infrastructure components yet. To still be able to provide an integrity guarantee such a TEE can defer measurements of the later boot stages to a virtual TPM device (vTPM).
To isolate it from the host a confidential vTPM is provisioned within the TEE during early boot and cryptographically linked to the TEE’s hardware evidence. To further secure secrets like private keys from the guest OS, the provisioning is performed at a certain privilege level preventing direct access and manipulation by the guest OS which is running at a lesser privilege level.
TPM is a mature technology, deployed in a lot of hardware to protect operating systems and workloads from being compromised. It’s seeing increased adoption and support in the Linux kernel and userland. A TPM device has multiple Platform Configuration Registers (PCR). Those can hold measurements and they can be “extended” with additional measurements in a one-way function to create a comprehensive, replayable log of events that occur during the boot process. “Measured Boot” is a procedure in which each boot step measures the subsequent step into a specific PCR. As a whole this represents a verifiable state of the system, much like an initial launch measurement, however with more granularity.
Image building
Modern OS Image build tools for Linux like systemd’s mkosi make it trivial to build OS images with dm-verity protection enabled, along with Unified Kernel Images (UKI) which bundles kernel, initrd and kernel cmdline into conveniently measurable artifacts. A modern distribution packaging recent systemd (v253+) revisions like Fedora (38+) will perform the required TPM measurements.
Creating reference values
To retrieve the expected measurements, for a dm-verity protected OS image, we can boot the resulting image in a trusted environment locally. The swtpm project is a great option to provide a local qemu VM with a vTPM, so we can produce the measurements that we expect at runtime.
In a TEE the vTPM would have to be isolated from both the Host and the Guest OS. We use swtpm to retrieve reference values here.
$ swtpm socket \
	--tpmstate dir=/tmp/vtpm \
	--ctrl type=unixio,path=/tmp/vtpm/swtpm.sock \
	--tpm2 \
	--log level=20
We retrieve VM firmware from debian’s repository and attach the vTPM socket as character device:
$ # retrieve vm firmware from debian's repo
$ wget http://security.debian.org/debian-security/pool/updates/main/e/edk2/ovmf_2022.11-6+deb12u1_all.deb
$ mkdir fw
$ dpkg-deb -x ovmf_2022.11-6+deb12u1_all.deb fw/
$ cp fw/usr/share/OVMF/OVMF_*.fd .
$ OS_IMAGE=image.raw
$ qemu-system-x86_64 \
	-machine type=q35,accel=kvm,smm=off \
	-m 1024 \
	-drive file=./OVMF_CODE.fd,format=raw,if=pflash \
	-drive file=./OVMF_VARS.fd,format=raw,if=pflash \
	-drive "file=${OS_IMAGE},format=raw" \
	-chardev socket,id=chrtpm,path=/tmp/vtpm/swtpm.sock \
	-tpmdev emulator,id=tpm0,chardev=chrtpm \
	-device tpm-tis,tpmdev=tpm0 \
	-nographic
Comparing PCRs
Once logged into the VM we can retrieve the relevant measurements in the form of PCRs (the package tpm2_tools needs to be available):
$ tpm2_pcrread sha256:0,1,2,3,4,5,6,7,8,9,10,11
  sha256:
	0 : 0x61E3B90D0862D052BF6C802E0FD2A44A671A37FE2EB67368D89CB56E5D23014E
	1 : 0x33D454DFCF5E46C0B7AFD332272E72ADC3D1A86CCAE25AA98DD475C9FCA36CFC
	2 : 0x7842C772A64365B48AC733EDEE9B131DF5F0E71EA95074F80E32450995C5773D
	3 : 0x3D458CFE55CC03EA1F443F1562BEEC8DF51C75E14A9FCF9A7234A13F198E7969
	4 : 0x22B156BE656EED7542AB03CC76DCC8A82F2A31044B5F17B3B8A388CB8DB37850
	5 : 0x3F72C8A7A38564991898859F725D12E5BE64CBD26265BC8F5E39CBE1101EBD49
	6 : 0x3D458CFE55CC03EA1F443F1562BEEC8DF51C75E14A9FCF9A7234A13F198E7969
	7 : 0x65CAF8DD1E0EA7A6347B635D2B379C93B9A1351EDC2AFC3ECDA700E534EB3068
	8 : 0x0000000000000000000000000000000000000000000000000000000000000000
	9 : 0x8E74577DC5814F2EBF094988CB2E789F1D637B4D43930F3714500F9E2E65615D
	10: 0x961D21A6CB38D377F951748BA7B8DD05A2E1BA6C712BB34EF7A39C5862721F1E
	11: 0x9DBA7A9D3C5200B0E526112151BBD23D77006CBFCF290CFA6249601CA9812608
If we boot the same image on a Confidential VM in Azure’s cloud, we’ll see different measurements. This is expected since the early boot stack does not match our reference setup:
$ tpm2_pcrread sha256:0,1,2,3,4,5,6,7,8,9,10,11
  sha256:
	0 : 0x782B20B10F55CC46E2142CC2145D548698073E5BEB82752C8D7F9279F0D8A273
	1 : 0x3D458CFE55CC03EA1F443F1562BEEC8DF51C75E14A9FCF9A7234A13F198E7969
	2 : 0x3D458CFE55CC03EA1F443F1562BEEC8DF51C75E14A9FCF9A7234A13F198E7969
	3 : 0x3D458CFE55CC03EA1F443F1562BEEC8DF51C75E14A9FCF9A7234A13F198E7969
	4 : 0xC7BB081502F18392EB5837951A9BA48E9DB23F91DE39A9AF8B2B29C333D71EA0
	5 : 0x0358DC1195BBDD59E3C556A452E292A6E7ECF11408BE7DAEC6776E678BEBEC23
	6 : 0x531086506EADC75D0E540F516D68E03095E5700FE8F1BD0F840025B07A3AB4F7
	7 : 0x64CDD65955B69C5ADD78577E32BFE52DDF9ADBF240977AEA39703908F4F6D8BA
	8 : 0x0000000000000000000000000000000000000000000000000000000000000000
	9 : 0x8E74577DC5814F2EBF094988CB2E789F1D637B4D43930F3714500F9E2E65615D
	10: 0x5A7ACDE0EF2AB221551CB24CCFDB7AE959047E3C0E0C39427D329992A9C7FDDF
	11: 0x9DBA7A9D3C5200B0E526112151BBD23D77006CBFCF290CFA6249601CA9812608
We can identify the common PCRs between the measurements in a cloud VM and those that we gathered in our reference setup. Those are good candidates to include them as reference values in a relying party against which a TEE’s evidence can be verified.
$ grep -F -x -f pcr_reference.txt pcr_cloud.txt
	3 : 0x3D458CFE55CC03EA1F443F1562BEEC8DF51C75E14A9FCF9A7234A13F198E7969
	8 : 0x0000000000000000000000000000000000000000000000000000000000000000
	9 : 0x8E74577DC5814F2EBF094988CB2E789F1D637B4D43930F3714500F9E2E65615D
	11: 0x9DBA7A9D3C5200B0E526112151BBD23D77006CBFCF290CFA6249601CA9812608
The UAPI Group’s TPM PCR Registry for Linux and systemd specifies PCR11 as a container for UKI measurements, covering kernel, initrd and kernel cmdline. Further registers that might be worth considering would be PCR4 (shim + UKI) or PCR7 (Secure Boot state).
Conclusion and outlook
We have looked at three different ways of building trust into OS host images for Confidential Containers. The intention was to illustrate how a chain of trust can be established using concrete examples and tools. The scenarios and technologies haven’t been covered comprehensively, each of those would be worth their own in-depth article.
Finally we have so far only covered the (mostly static) steps and components that provide a sandbox for confidential containers. Asserting integrity for containers themselves is a unique challenge for CoCo. There are a lot of dynamic aspects to consider in a realistic container deployment. Future articles might provide insights into how this can be achieved.
Thanks to Pradipta Banerjee, Iago López Galeiras & Tobin Feldman-Fitzthum for reviewing this post!