Confidential Containers is an open source project that brings confidential computing to Cloud Native environments, leveraging hardware technology to protect complex workloads. Confidential Containers is a CNCF sandbox project.
This is the multi-page printable view of this section. Click here to print.
Documentation
- 1: Overview
- 2: Getting Started
- 2.1: Prerequisites
- 2.1.1: Hardware Requirements
- 2.1.1.1: CoCo without Hardware
- 2.1.1.2: Secure Execution Host Setup
- 2.1.1.3: SEV-SNP Host Setup
- 2.1.1.4: SGX Host Setup
- 2.1.1.5: TDX Host Setup
- 2.1.2: Cloud Hardware
- 2.1.3: Cluster Setup
- 2.2: Installation
- 2.3: Simple Workload
- 3: Architecture
- 3.1: Design Overview
- 3.2: Trust Model
- 3.2.1: Trust Model for Confidential Containers
- 3.2.2: Personas
- 4: Features
- 4.1: Get Attestation
- 4.2: Get Secret Resources
- 4.3: Authenticated Registries
- 4.4: Encrypted Images
- 4.5: Local Registries
- 4.6: Protected Storage
- 4.7: Sealed Secrets
- 4.8: Signed Images
- 5: Attestation
- 5.1: CoCo Setup
- 5.2: Installation
- 5.2.1: Trustee Operator
- 5.2.2: Trustee in Docker
- 5.3: KBS Client Tool
- 5.4: Resources
- 5.4.1: Resource Backends
- 5.4.2: Azure Key Vault Integration
- 5.5: Policies
- 5.6: Reference Values
- 6: Examples
- 6.1: AWS
- 6.2: Azure
- 6.3: Container Launch with SNP Memory Encryption
- 6.4: GCP
- 7: Use Cases
- 7.1: Confidential AI
- 7.2: Switchboard Oracles: Securing Web3 Data with Confidential Containers
- 7.3: Secure Supply Chain
- 8: Troubleshooting
- 9: Contributing
1 - Overview
High-level overview of Confidential Containers
What is the Confidential Containers project?
Confidential Containers encapsulates pods inside of confidential virtual machines, allowing Cloud Native workloads to leverage confidential computing hardware with minimal modification.
Confidential Containers extends the guarantees of confidential computing to complex workloads. With Confidential Containers, sensitive workloads can be run on untrusted hosts and be protected from compromised or malicious users, software, and administrators.
Confidential Containers provides an end-to-end framework for deploying workloads, attesting them, and provisioning secrets.
What hardware does Confidential Containers support?
On bare metal Confidential Containers supports the following platforms:
| Platform | Supports Attestation | Uses Kata |
|---|---|---|
| Intel TDX | Yes | Yes |
| Intel SGX | Yes | No |
| AMD SEV-SNP | Yes | Yes |
| AMD SEV(-ES) | No | Yes |
| IBM Secure Execution | Yes | Yes |
Confidential Containers can also be deployed in a cloud environment using the
cloud-api-adaptor.
The following platforms are supported.
| Platform | Cloud | Notes |
|---|---|---|
| SNP | Azure | |
| TDX | Azure | |
| Secure Execution | IBM | |
| None | AWS | Under development |
| SNP | GCP | |
| TDX | GCP | Under development |
| None | LibVirt | For local testing |
Confidential Containers provides an attestation and key-management engine, called Trustee which is able to attest the following platforms:
| Platform |
|---|
| AMD SEV-SNP |
| Intel TDX |
| Intel SGX |
| AMD SEV-SNP with Azure vTPM |
| Intel TDX with Azure vTPM |
| IBM Secure Execution |
| ARM CCA |
| Hygon CSV |
Trustee can be used with Confidential Containers or to attest standalone confidential guests.
See Attestation section for more information.
2 - Getting Started
High level overview of Confidential Containers
This section will describe hardware and software prerequisites, installing Confidential Containers with an operator, verifying the installation, and running a pod with Confidential Containers.
2.1 - Prerequisites
Requirements for deploying Confidential Containers
This section will describe hardware and software prerequisites, installing Confidential Containers with an operator, verifying the installation, and running a pod with Confidential Containers.
2.1.1 - Hardware Requirements
Hardware requirements for deploying Confidential Containers
Confidential Computing is a hardware technology. Confidential Containers supports multiple hardware platforms and can leverage cloud hardware. If you do not have bare metal hardware and will deploy Confidential Containers with a cloud integration, continue to the cloud section.
You can also run Confidential Containers without hardware support for testing or development.
The Confidential Containers operator, which is described in the following section, does not setup the host kernel, firmware, or system configuration. Before installing Confidential Containers on a bare metal system, make sure that your node can start confidential VMs.
This section will describe the configuration that is required on the host.
Regardless of your platform, it is recommended to have at least 8GB of RAM and 4 cores on your worker node.
2.1.1.1 - CoCo without Hardware
Testing and development without hardware
For testing or development, Confidential Containers can be deployed without any hardware support.
This is referred to as a coco-dev or non-tee.
A coco-dev deployment functions the same way as Confidential Containers
with an enclave, but a non-confidential VM is used instead of a confidential VM.
This does not provide any security guarantees, but it can be used for testing.
No additional host configuration is required as long as the host supports virtualization.
2.1.1.2 - Secure Execution Host Setup
Host configurations for IBM s390x
Platform Setup
This document outlines the steps to configure a host machine to support IBM Secure Execution on IBM Z & LinuxONE platforms. This capability enables enhanced security for workloads by taking advantage of protected virtualization. Ensure the host meets the necessary hardware and software requirements before proceeding.
Hardware Requirements
Supported hardware includes these systems:
- IBM z15 or newer models
- IBM LinuxONE III or newer models
Software Requirements
Additionally, the system must meet specific CPU and kernel configuration requirements. Follow the steps below to verify and enable the Secure Execution capability.
-
Verify Protected Virtualization Support in the Kernel
Run the following command to ensure the kernel supports protected virtualization:
cat /sys/firmware/uv/prot_virt_hostA value of 1 indicates support.
-
Check Ultravisor Memory Reservation
Confirm that the ultravisor has reserved memory during the current boot:
sudo dmesg | grep -i ultravisorExample output:
[ 0.063630] prot_virt.f9efb6: Reserving 98MB as ultravisor base storage -
Validate the Secure Execution Facility Bit
Ensure the required facility bit (158) is present:
cat /proc/cpuinfo | grep 158The facilities field should include 158.
If any required configuration is missing, contact your cloud provider to enable the Secure Execution capability for a machine. Alternatively, if you have administrative privileges and the facility bit (158) is set, you can enable it by modifying kernel parameters and rebooting the system:
-
Modify Kernel Parameters
Update the kernel configuration to include the prot_virt=1 parameter:
sudo sed -i 's/^\(parameters.*\)/\1 prot_virt=1/g' /etc/zipl.conf -
Update the Bootloader and reboot the System
Apply the changes to the bootloader and reboot the system:
sudo zipl -V sudo systemctl reboot -
Repeat the Verification Steps
After rebooting, repeat the verification steps above to ensure Secure Execution is properly enabled.
Additional Notes
- The steps to enable Secure Execution might vary depending on the Linux distributions. Consult your distribution’s documentation if necessary.
- For more detailed information about IBM Secure Execution for Linux, see also the official documentation at IBM Secure Execution for Linux.
2.1.1.3 - SEV-SNP Host Setup
Host configurations for AMD SEV-SNP machines
Platform Setup
The host BIOS and kernel must be capable of supporting AMD SEV-SNP and the host must be configured accordingly.
The latest SEV Firmware version is available on AMD’s SEV Developer Webpage. It can also be updated via a platform OEM BIOS update.
The host kernel must be equal to or later than upstream version 6.11.
To build just the upstream compatible host kernel, use the Confidential Containers fork of AMDESE AMDSEV. Individual components can be built by running the following command:
./build.sh kernel host --install
Additionally, sev-utils can be used to install the required host kernel, but it will unnecessarily build AMD compatible guest kernel, OVMF, and QEMU components as these packages are already packaged with Kata. The additional components can be used with the script utility to test launch and attest a base QEMU SNP guest.
2.1.1.4 - SGX Host Setup
Host configurations for Intel SGX machines
TODO
2.1.1.5 - TDX Host Setup
Host configurations for Intel® Trust Domain Extensions (TDX)
Platform Setup
Additional Notes
- For more detailed information about Intel TDX, see also official documentation.
2.1.2 - Cloud Hardware
Confidential Containers on the Cloud
Note
If you are using bare metal confidential hardware, you can skip this section.Confidential Containers can be deployed via confidential computing cloud offerings. The main method of doing this is to use the cloud-api-adaptor also known as “peer pods.”
Some clouds also support starting confidential VMs inside of non-confidential VMs. With Confidential Containers these offerings can be used as if they were bare-metal.
2.1.3 - Cluster Setup
Cluster prerequisites
Confidential Containers requires Kubernetes. A cluster must be installed before running the operator. Many different clusters can be used but they should meet the following requirements.
- The minimum Kubernetes version is 1.24
- Cluster must use
containerdorcri-o. - At least one node has the label
node.kubernetes.io/worker. - SELinux is not enabled.
If you use Minikube or Kind to setup your cluster, you will only be able to use runtime classes based on Cloud Hypervisor due to an issue with QEMU.
2.2 - Installation
Installing Confidential Containers with the operator
Note
Make sure you have completed the pre-requisites before installing Confidential Containers.Deploy the operator
Deploy the operator by running the following command where <RELEASE_VERSION> needs to be substituted
with the desired release tag.
kubectl apply -k github.com/confidential-containers/operator/config/release?ref=<RELEASE_VERSION>
For example, to deploy the v0.10.0 release run:
kubectl apply -k github.com/confidential-containers/operator/config/release?ref=v0.10.0
Wait until each pod has the STATUS of Running.
kubectl get pods -n confidential-containers-system --watch
Create the custom resource
Creating a custom resource installs the required CC runtime pieces into the cluster node and creates the runtime classes.
kubectl apply -k github.com/confidential-containers/operator/config/samples/ccruntime/default?ref=<RELEASE_VERSION>
kubectl apply -k github.com/confidential-containers/operator/config/samples/ccruntime/s390x?ref=<RELEASE_VERSION>
kubectl apply -k github.com/confidential-containers/operator/config/samples/enclave-cc/hw?ref=<RELEASE_VERSION>
Note
If using enclave-cc with SGX, please refer to this guide for more information on setting the custom resource.Wait until each pod has the STATUS of Running.
kubectl get pods -n confidential-containers-system --watch
Verify Installation
See if the expected runtime classes were created.
kubectl get runtimeclass
Should return
NAME                 HANDLER              AGE
kata                 kata-qemu            8d
kata-clh             kata-clh             8d
kata-qemu            kata-qemu            8d
kata-qemu-coco-dev   kata-qemu-coco-dev   8d
kata-qemu-sev        kata-qemu-sev        8d
kata-qemu-snp        kata-qemu-snp        8d
kata-qemu-tdx        kata-qemu-tdx        8d
NAME           HANDLER        AGE
kata           kata-qemu      60s
kata-qemu      kata-qemu      61s
kata-qemu-se   kata-qemu-se   61s
NAME            HANDLER         AGE
enclave-cc      enclave-cc      9m55s
Runtime Classes
CoCo supports many different runtime classes. Different deployment types install different sets of runtime classes. The operator may install some runtime classes that are not valid for your system. For example, if you run the operator on a TDX machine, you might have TDX and SEV runtime classes. Use the runtime classes that match your hardware.
| Name | Type | Description |
|---|---|---|
kata |
x86 | Alias of the default runtime handler (usually the same as kata-qemu) |
kata-clh |
x86 | Kata Containers (non-confidential) using Cloud Hypervisor |
kata-qemu |
x86 | Kata Containers (non-confidential) using QEMU |
kata-qemu-coco-dev |
x86 | CoCo without an enclave (for testing only) |
kata-qemu-sev |
x86 | CoCo with QEMU for AMD SEV HW |
kata-qemu-snp |
x86 | CoCo with QEMU for AMD SNP HW |
kata-qemu-tdx |
x86 | CoCo with QEMU for Intel TDX HW |
kata-qemu-se |
s390x | CoCO with QEMU for Secure Execution |
enclave-cc |
SGX | CoCo with enclave-cc (process-based isolation without Kata) |
2.3 - Simple Workload
Running a simple confidential workload
Creating a sample Confidential Containers workload
Once you’ve used the operator to install Confidential Containers, you can run a pod with CoCo by simply adding a runtime class.
First, we will use the kata-qemu-coco-dev runtime class which uses CoCo without hardware support.
Initially we will try this with an unencrypted container image.
In this example, we will be using the bitnami/nginx image as described in the following yaml:
apiVersion: v1
kind: Pod
metadata:
  labels:
    run: nginx
  name: nginx
  annotations:
    io.containerd.cri.runtime-handler: kata-qemu-coco-dev
spec:
  containers:
  - image: bitnami/nginx:1.22.0
    name: nginx
  dnsPolicy: ClusterFirst
  runtimeClassName: kata-qemu-coco-dev
For the most basic workloads, setting the runtimeClassName and runtime-handler annotation is usually
the only requirement for the pod YAML.
Create a pod YAML file as previously described (we named it nginx.yaml) .
Create the workload:
kubectl apply -f nginx.yaml
Output:
pod/nginx created
Ensure the pod was created successfully (in running state):
kubectl get pods
Output:
NAME    READY   STATUS    RESTARTS   AGE
nginx   1/1     Running   0          3m50s
3 - Architecture
Architectural Details of the Confidential Containers Project
3.1 - Design Overview
The basic ideas behind Confidential Containers
Confidential computing projects are largely defined by what is inside the enclave and what is not. For Confidential Containers, the enclave contains the workload pod and helper processes and daemons that facilitate the workload pod. Everything else, including the hypervisor, other pods, and the control plane, is outside of the enclave and untrusted. This division is carefully considered to balance TCB size and sharing.
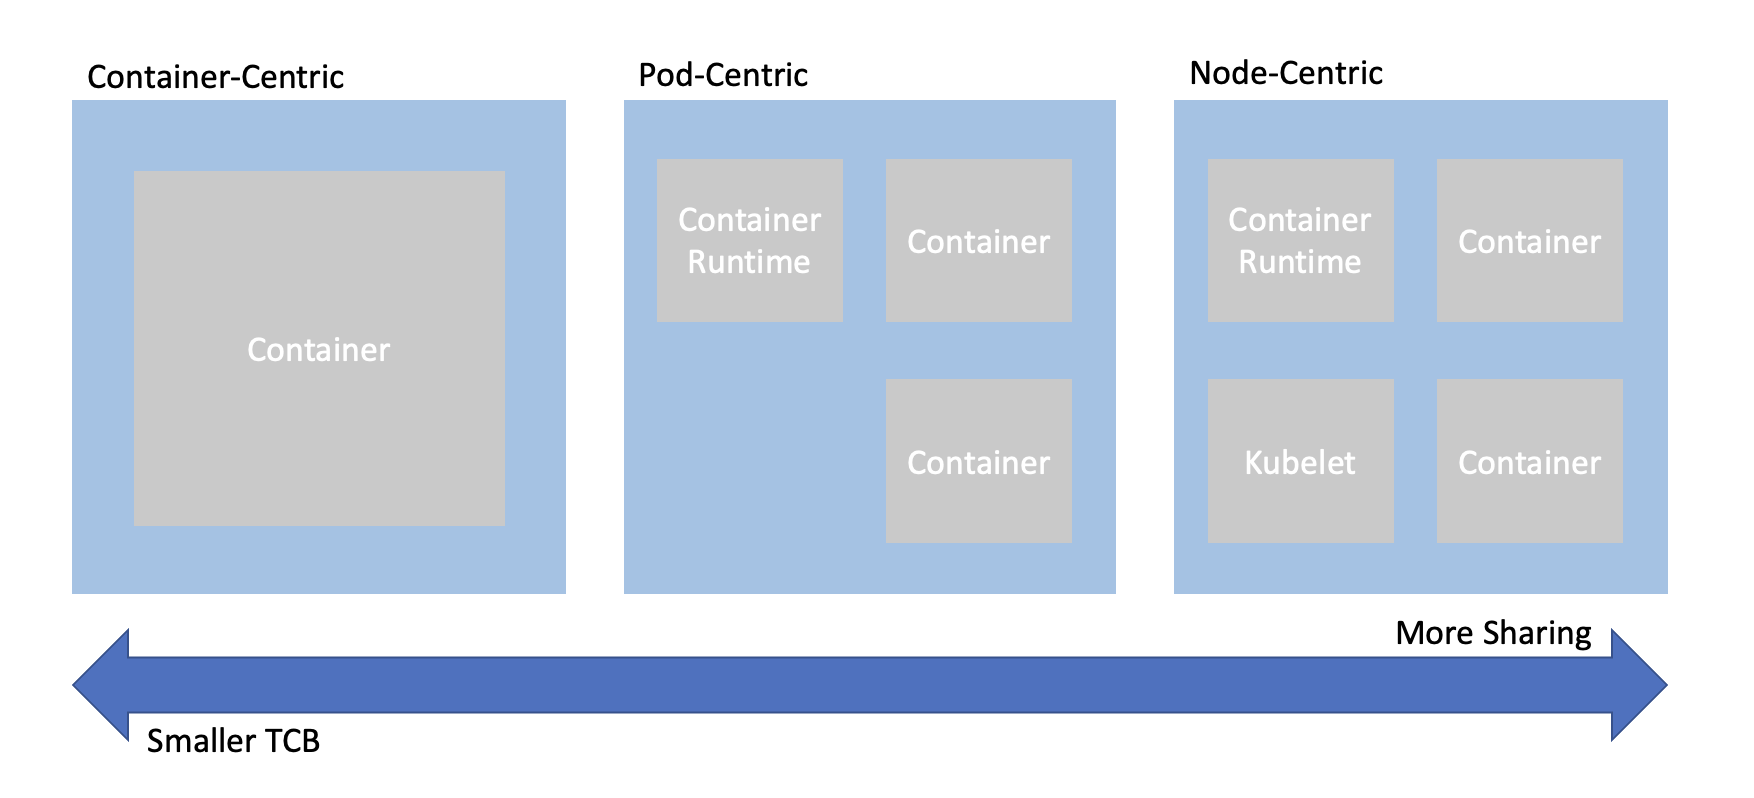
When trying to combine confidential computing and cloud native computing, often the first thing that comes to mind is either to put just one container inside of an enclave, or to put an entire worker node inside of the an enclave. This is known as container-centeric virtualization or node-centric virtualization. Confidential Containers opts for a compromise between these approaches which avoids some of their pitfalls. Specifically, node-centric approaches tend to have a large TCB that includes components such as the Kubelet. This makes the attack surface of the confidential guest significantly larger. It is also difficult to implement managed clusters in node-centric approaches because the workload runs in the same context as the rest of the cluster. On the other hand, container-centric approaches can support very little sharing of resources. Sharing is a loose term, but one example is two containers that need to share information over the network. In a container-centric approach this traffic would leave the enclave. Protecting the traffic would add overhead and complexity.
Confidential Containers takes a pod-centric approach which balances TCB size and sharing. While Confidential Containers does have some daemons and processes inside the enclave, the API of the guest is relatively small. Furthermore the guest image is static and generic across workloads and even platforms, making it simpler to ensure security guarantees. At the same time, sharing between containers in the same pod is easy. For example, the pod network namespace doesn’t leave the enclave, so containers can communicate confidentially on it without additional overhead. These are just a few of the reasons why pod-centric virtualization seems to be the best way to provide confidential cloud native computing.
Kata Containers
Confidential Containers and Kata Containers are closely linked, but the relationship might not be obvious at first. Kata Containers is an existing open source project that encapsulates pods inside of VMs. Given the pod-centric design of Confidential Containers this is a perfect match. But if Kata runs pods inside of VM, why do we need the Confidential Containers project at all? There are crucial changes needed on top of Kata Containers to preserve confidentiality.
Image Pulling
When using Kata Containers container images are pulled on the worker node with the help of a CRI runtime like containerd.
The images are exposed to the guest via filesystem passthrough.
This is not suitable for confidential workloads because the container images are exposed to the untrusted host.
With Confidential Containers images are pulled and unpacked inside of the guest.
This requires additional components such as image-rs to be part of the guest rootfs.
These components are beyond the scope of traditional Kata deployments and live in the Confidential Containers
guest components repository.
On the host, we use a snapshotter to pre-empt image pull and divert control flow to image-rs inside the guest.
sequenceDiagram
    kubelet->>containerd: create container
    containerd->>nydus snapshotter: load container snapshot
    nydus snapshotter->>image-rs: download container
    kubelet->>containerd: start container
    containerd->>kata shim: start container
    kata shim->>kata agent: start container
The above is a simplified diagram showing the interaction of containerd, the nydus snapshotter, and image-rs. The diagram does not show the creation of the sandbox.
Attestation
Confidential Containers also provides components inside the guest and elsewhere to facilitate attestation.
Attestation is a crucial part of confidential computing and a direct requirement of many guest operations.
For example, to unpack an encrypted container image, the guest must retrieve a secret key.
Inside the guest the confidential-data-hub and attestation-agent handle operations involving
secrets and attestation.
Again, these components are beyond the scope of traditional Kata deployments and are located in the
guest components repository.
The CDH and AA use the KBS Protocol to communicate with an external, trusted entity. Confidential Containers provides Trustee as an attestation service and key management engine that validates the guest TCB and releases secret resources.
sequenceDiagram
    workload->>CDH: request secret
    CDH->>AA: get attestation token
    AA->>KBS: attestation request
    KBS->>AA: challenge
    AA->>KBS: attestation
    KBS->>AA: attestation token
    AA->>CDH: attestation token
    CDH->>KBS: secret request
    KBS->>CDH: encrypted secret
    CDH->>workload: secret
The above is a somewhat simplified diagram of the attestation process. The diagram does not show the details of how the workload interacts with the CDH.
Putting the pieces together
If we take Kata Containers and add guest image pulling and attestation, we arrive at the following diagram, which represents Confidential Containers.
flowchart TD
    kubelet-->containerd
    containerd-->kata-shim
    kata-shim-->hypervisor
    containerd-->nydus-snapshotter

    subgraph guest
        kata-agent-->pod
        ASR-->CDH
        CDH<-->AA
        pod-->ASR
        image-rs-->pod
        image-rs-->CDH
    end
    subgraph pod
        container-a
        container-b
        container-c
    end
    subgraph Trustee
        KBS-->AS
        AS-->RVPS
    end

AA-->KBS
CDH-->KBS
nydus-snapshotter-->image-rs
hypervisor-->guest
kata-shim<-->kata-agent
image-rs<-->registry
Clouds and Nesting
Most confidential computing hardware does not support nesting. More specifically, a confidential guest cannot be started inside of a confidential guest, and with few exceptions a confidential guest cannot be started inside of a non-confidential guest. This poses a challenge for those who do not have access to bare metal machines or would like to have virtual worker nodes.
To alleviate this, Confidential Containers supports a deployment mode known as Peer Pods, where a component called the Cloud API Adaptor takes the place of a conventional hypervisor. Rather than starting a confidential PodVM locally, the CAA reaches out to a cloud API. Since the PodVM is no longer started locally the worker node can be virtualized. This also allows confidential containers to integrate with cloud confidential VM offerings.
Peer Pods deployments share most of the same properties that are described in this guide.
Process-based Isolation
Confidential Containers also supports SGX with enclave-cc. Because the Kata guest cannot be run as a single process, the design of enclave-cc is significantly different. In fact, enclave-cc doesn’t use Kata at all, but it does still represent a pod-centric approach with some sharing between containers even as they run in separate enclaves. enclave-cc does use some of the guest components as crates.
Components
Confidential Containers integrates many components. Here is a brief overview of most the components related to the project.
| Component | Repository | Purpose |
|---|---|---|
| Operator | operator | Installs Confidential Containers |
| Kata Shim | kata-containers/kata-containers | Starts PodVM and proxies requests to Kata Agent |
| Kata Agent | kata-containers/kata-containers | Sets up and runs the workload inside of a VM |
| image-rs | guest-components | Downloads and unpacks container images |
| ocicrypt-rs | guest-components | Decrypts encrypted container layers |
| confidential-data-hub | guest-components | Handles secret resources |
| attestation-agent | guest-components | Attests guest |
| api-server-rest | guest-components | Proxies requests from workload container to CDH |
| key-broker-service | Trustee | Coordinates attestation and secret delivery (relying party) |
| attestation-service | Trustee | Validate hardware evidence (verifier) |
| reference-value-provider-service | Trustee | Manages reference values |
| Nydus Snapshotter | containerd/nydus-snapshotter | Triggers guest image pulling |
| cloud-api-adaptor | cloud-api-adaptor | Starts PodVM in the cloud |
| agent-protocol-forwarder | cloud-api-adaptor | Forwards Kata Agent API from cloud API |
Component Dependencies
Many of the above components depend on each other either directly in the source, during packaging, or at runtime. The basic premise is that the operator deploys a special configuration of Kata containers that uses a rootfs (built by the Kata CI) that includes the guest components. This diagram shows these relationships in more detail. The diagram does not capture runtime interactions.
flowchart LR
    Trustee --> Versions.yaml
    Guest-Components --> Versions.yaml
    Kata --> kustomization.yaml
    Guest-Components .-> Client-tool
    Guest-Components --> enclave-agent
    enclave-cc --> kustomization.yaml
    Guest-Components --> versions.yaml
    Trustee --> versions.yaml
    Kata --> versions.yaml

    subgraph Kata
        Versions.yaml
    end
    subgraph Guest-Components
    end
    subgraph Trustee
        Client-tool
    end
    subgraph enclave-cc
        enclave-agent
    end
    subgraph Operator
        kustomization.yaml
        reqs-deploy
    end
    subgraph cloud-api-adaptor
        versions.yaml
    end
Workloads
Confidential Containers provides a set of primitives for building confidential Cloud Native applications. For instance, it allows a pod to be run inside of a confidential VM, it handles encrypted and signed container image, sealed secrets, and other features described in the features section. This does not guarantee that any application run with Confidential Containers is confidential or secure. Users deploying applications with Confidential Containers should understand the attack surface and security applications of their workloads, focusing especially on APIs that cross the confidential trust boundary.
3.2 - Trust Model
Documentation on the Confidential Containers trust model
3.2.1 - Trust Model for Confidential Containers
Overview of Confidential Containers security
Confidential Containers mainly relies on VM enclaves, where the guest does not trust the host. Confidential computing, and by extension Confidential Containers, provides technical assurances that the untrusted host cannot access guest data or manipulate guest control flow.
Trusted
Confidential Containers maps pods to confidential VMs, meaning that everything inside a pod is
within an enclave. In addition to the workload pod, the guest also contains helper processes
and daemons to setup and control the pod.
These include the kata-agent and guest components as described in the architecture section.
More specifically, the guest is defined as four components.
- Guest firmware
- Guest kernel
- Guest kernel command line
- Guest root filesystem
All platforms supported by Confidential Containers must measure these four components. Details about the mechanisms for each platform are below.
Note that the hardware measurement usually does not directly cover the workload containers. Instead, containers are covered by a second-stage of measurement that uses generic OCI standards such as signing. This second stage of measurement is rooted in the trust of the first stage, but decoupled from the guest image.
Confidential Containers also relies on an external trusted entity, usually Trustee, to attest the guest.
Untrusted
Everything on the host outside of the enclave is untrusted. This includes the Kubelet, CRI runtimes like containerd, the host kernel, the Kata Shim, and more.
Since the Kubernetes control plane is untrusted, some traditional Kubernetes security techniques are not relevant to Confidential Containers without special considerations.
Crossing the trust boundary
In confidential computing careful scrutiny is required whenever information crosses the boundary between the trusted and untrusted contexts. Secrets should not leave the enclave without protection and entities outside of the enclave should not be able to trigger malicious behavior inside the guest.
In Confidential Containers there are APIs that cross the trust boundary. The main example is the API between the Kata Agent in the guest and the Kata Shim on the host. This API is protected with an OPA policy running inside the guest that can block malicious requests by the host.
Note that the kernel command line, which is used to configure the Kata Agent, does not cross the trust boundary because it is measured at boot. Assuming that the guest measurement is validated, the APIs that are most significant are those that are not measured by the hardware.
Quantifying the attack surface of an API is non-trivial. The Kata Agent can perform complex operations such as mounting a block device provided by the host. In the case that a host-provided device is attached to the guest the attack surface is extended to any information provided by this device. It’s also possible that any of the code used to implement the API inside the guest has a bug in it. As the complexity of the API increases, the likelihood of a bug increases. The nuances of the Kata Agent API is why Confidential Containers relies on a dynamic and user-configurable policy to either block endpoints entirely or only allow particular types of requests to be made. For example, the policy can be used to make sure that a block device is mounted only to a particular location.
Applications deployed with Confidential Containers should also be aware of the trust boundary. An application running inside of an enclave is not secure if it exposes a dangerous API to the outside world. Confidential applications should almost always be deployed with signed and/or encrypted images. Otherwise the container image itself can be considered as part of the unmeasured API.
Out of Scope
Some attack vectors are out of scope of confidential computing and Confidential Containers. For instance, confidential computing platforms usually do not protect against hardware side-channels. Neither does Confidential Containers. Different hardware platforms and platform generations may have different guarantees regarding properties like memory integrity. Confidential Containers inherits the properties of whatever TEE it is using.
Confidential computing does not protect against denial of service. Since the untrusted host is in charge of scheduling, it can simply not run the guest. This is true for Confidential Containers as well. In Confidential Containers the untrusted host can avoid scheduling the pod VM and the untrusted control plane can avoid scheduling the pod. These are seen as equivalent.
In general orchestration is untrusted in Confidential Containers. Confidential Containers provides few guarantees about where, when, or in what order workloads run, besides that the workload is deployed inside of a genuine enclave containing the expected software stack.
Cloud Native Personas
So far the trust model has been described in terms of a host and a guest, following from the underlying confidential computing trust model, but these terms are not used in cloud native computing. How do we understand the trust model in terms of cloud native personas? Confidential Containers is a flexible project. It does not explicitly define how parties should interact. but some possible arrangements are described in the personas section.
Measurement Details
As mentioned above, all hardware platforms must measure the four components representing the guest image. This table describes how each platform does this.
| Platform | Firmware | Kernel | Command Line | Rootfs |
|---|---|---|---|---|
| SEV-SNP | Pre-measured by ASP | Measured direct boot via OVMF | Measured direct boot | Measured direct boot |
| TDX | Pre-launch measurement | RTMR | RTMR | Dm-verity hash provided in command line |
| SE | Included in encrypted SE image | included in SE image | included in SE image | included in SE image |
See Also
- Confidential Computing Consortium (CCC) published “A Technical Analysis of Confidential Computing” section 5 of which defines the threat model for confidential computing.
- CNCF Security Technical Advisory Group published “Cloud Native Security Whitepaper”
- Kubernetes provides documentation : “Overview of Cloud Native Security”
- Open Web Application Security Project - “Docker Security Threat Modeling”
3.2.2 - Personas
Description and discussion of relevant agents/actors in the context of Confidential Containers
Personas
Otherwise referred to as actors or agents, these are individuals or groups capable of carrying out a particular threat. In identifying personas we consider :
- The Runtime Environment, Figure 5, Page 19 of CNCF Cloud Native Security Paper. This highlights three layers, Cloud/Environment, Workload Orchestration, Application.
- The Kubernetes Overview of Cloud Native Security identifies the 4C’s of Cloud Native Security as Cloud, Cluster, Container and Code. However data is core to confidential containers rather than code.
- The Confidential Computing Consortium paper A Technical Analysis of Confidential Computing defines Confidential Computing as the protection of data in use by performing computations in a hardware-based Trusted Execution Environment (TEE).
In considering personas we recognise that a trust boundary exists between each persona and we explore how the least privilege principle (as described on Page 40 of Cloud Native Security Paper ) should apply to any actions which cross these boundaries.
Confidential containers can provide enhancements to ensure that the expected code/containers are the only code that can operate over the data. However any vulnerabilities within this code are not mitigated by using confidential containers, the Cloud Native Security Whitepaper details Lifecycle aspects that relate to the security of the code being placed into containers such as Static/Dynamic Analysis, Security Tests, Code Review etc which must still be followed.

Any of these personas could attempt to perform malicious actions:
Infrastructure Operator
This persona has privileges within the Cloud Infrastructure which includes the hardware and firmware used to provide compute, network and storage to the Cloud Native solution. They are responsible for availability of infrastructure used by the cloud native environment.
- Have access to the physical hardware.
- Have access to the processes involved in the deployment of compute/storage/memory used by any orchestration components and by the workload.
- Have control over TEE hardware availability/type.
- Responsibility for applying firmware updates to infrastructure including the TEE Technology.
Examples: Cloud Service Provider (CSP), Site Reliability Engineer, etc. (SRE)
Orchestration Operator
This persona has privileges within the Orchestration/Cluster. They are responsible for deploying a solution into a particular cloud native environment and managing the orchestration environment. For managed cluster this would also include the administration of the cluster control plane.
- Control availability of service.
- Control webhooks and deployment of workloads.
- Control availability of cluster resources (data/networking/storage) and cluster services (Logging/Monitoring/Load Balancing) for the workloads.
- Control the deployment of runtime artifacts required by the TEE during initialisation, before hosting the confidential workload.
Example: A Kubernetes administrator responsible for deploying pods to a cluster and maintaining the cluster.
Workload Provider
This persona designs and creates the orchestration objects comprising the solution (e.g. Kubernetes Pod spec, etc). These objects reference containers published by Container Image Providers. In some cases the Workload and Container Image Providers may be the same entity. The solution defined is intended to provide the Application or Workload which in turn provides value to the Data Owners (customers and clients). The Workload Provider and Data Owner could be part of same company/organisation but following the least privilege principle the Workload Provider should not be able to view or manipulate end user data without informed consent.
- Need to prove to customer aspects of compliance.
- Defines what the solution requires in order to run and maintain compliance (resources, utility containers/services, storage).
- Chooses the method of verifying the container images (from those supported by Container Image Provider) and obtains artifacts needed to allow verification to be completed within the TEE.
- Provide the boot images initially required by the TEE during initialisation or designates a trusted party to do so.
- Provide the attestation verification service, or designate a trusted party to provide the attestation verification service.
Examples: 3rd party software vendor, CSP
Container Image Provider
This persona is responsible for the part of the supply chain that builds container images and provides them for use by the solution. Since a workload can be composed of multiple containers, there may be multiple container image providers, some will be closely connected to the workload provider (business logic containers), others more independent to the workload provider (side car containers). The container image provider is expected to use a mechanism to allow provenance of container image to be established when a workload pulls in these images at deployment time. This can take the form of signing or encrypting the container images.
- Builds container images.
- Owner of business logic containers. These may contain proprietary algorithms, models or secrets.
- Signs or encrypts the images.
- Defines the methods available for verifying the container images to be used.
- Publishes the signature verification key (public key).
- Provides any decryption keys through a secure channel (generally to a key management system controlled by a Key Broker Service).
- Provides other required verification artifacts (secure channel may be considered).
- Protects the keys used to sign or encrypt the container images.
It is recognised that hybrid options exist surrounding workload provider and container provider. For example the workload provider may choose to protect their supply chain by signing/encrypting their own container images after following the build patterns already established by the container image provider.
Example : Istio
Data Owner
Owner of data used, and manipulated by the application.
- Concerned with visibility and integrity of their data.
- Concerned with compliance and protection of their data.
- Uses and shares data with solutions.
- Wishes to ensure no visibility or manipulation of data is possible by Orchestration Operator or Cloud Operator personas.
Discussion
Data Owner vs. All Other Personas
The key trust relationship here is between the Data Owner and the other personas. The Data Owner trusts the code in the form of container images chosen by the Workload Provider to operate across their data, however they do not trust the Orchestration Operator or Cloud Operator with their data and wish to ensure data confidentiality.
Workload Provider vs. Container Image Provider
The Workload Provider is free to choose Container Image Providers that will provide not only the images they need but also support the verification method they require. A key aspect to this relationship is the Workload Provider applying Supply Chain Security practices (as described on Page 42 of Cloud Native Security Paper ) when considering Container Image Providers. So the Container Image Provider must support the Workload Providers ability to provide assurance to the Data Owner regarding integrity of the code.
With Confidential Containers we match the TEE boundary to the most restrictive boundary which is between the Workload Provider and the Orchestration Operator.
Orchestration Operator vs. Infrastructure Operator
Outside the TEE we distinguish between the Orchestration Operator and the Infrastructure Operator due to nature of how they can impact the TEE and the concerns of Workload Provider and Data Owner. Direct threats exist from the Orchestration Operator as some orchestration actions must be permitted to cross the TEE boundary otherwise orchestration cannot occur. A key goal is to deprivilege orchestration and restrict the Orchestration Operators privileges across the boundary. However indirect threats exist from the Infrastructure Operator who would not be permitted to exercise orchestration APIs but could exploit the low-level hardware or firmware capabilities to access or impact the contents of a TEE.
Workload Provider vs. Data Owner
Inside the TEE we need to be able to distinguish between the Workload Provider and Data Owner in recognition that the same workload (or parts such as logging/monitoring etc) can be re-used with different data sets to provide a service/solution. In the case of bespoke workload, the workload provider and Data Owner may be the same persona. As mentioned the Data Owner must have a level of trust in the Workload Provider to use and expose the data provided in an expected and approved manner. Page 10 of A Technical Analysis of Confidential Computing , suggests some approaches to establish trust between them.
The TEE boundary allows the introduction of secrets but just as we recognised the TEE does not provide protection from code vulnerabilities, we also recognised that a TEE cannot enforce complete distrust between Workload Provider and Data Owner. This means secrets within the TEE are at risk from both Workload Provider and Data Owner and trying to keep secrets which protect the workload (container encryption etc), separated from secrets to protect the data (data encryption) is not provided simply by using a TEE.
Recognising that Data Owner and Workload Provider are separate personas helps us to identify threats to both data and workload independently and to recognise that any solution must consider the potential independent nature of these personas. Two examples of trust between Data Owner and Workload Provider are :
- AI Models which are proprietary and protected requires the workload to be encrypted and not shared with the Data Owner. In this case secrets private to the Workload Provider are needed to access the workload, secrets requiring access to the data are provided by the Data Owner while trusting the workload/model without having direct access to how the workload functions. The Data Owner completely trusts the workload and Workload Provider, whereas the Workload Provider does not trust the Data Owner with the full details of their workload.
- Data Owner verifies and approves certain versions of a workload, the workload provides the data owner with secrets in order to fulfil this. These secrets are available in the TEE for use by the Data Owner to verify the workload, once achieved the data owner will then provide secrets and data into the TEE for use by the workload in full confidence of what the workload will do with their data. The Data Owner will independently verify versions of the workload and will only trust specific versions of the workload with the data whereas the Workload Provider completely trusts the Data Owner.
Data Owner vs. End User
We do not draw a distinction between data owner and end user though we do recognise that in some cases these may not be identical. For example data may be provided to a workload to allow analysis and results to be made available to an end user. The original data is never provided directly to the end user but the derived data is, in this case the data owner can be different from the end user and may wish to protect this data from the end user.
4 - Features
Primitives provided by Confidential Containers
In addition to running pods inside of enclaves, Confidential Containers provides several other features that can be used to protect workloads and data. Securing complex workloads often requires using some of these features.
Most features depend on and require attestation, which is described in the next section.
4.1 - Get Attestation
Workloads that request attestation evidence
Warning
This feature is disabled by default due to some subtle security considerations which are described below.Workloads can directly request attestation evidence. A workload could use this evidence to carry out its own attestation protocol.
Enabling
To enable this feature, set the following parameter in the guest kernel command line.
agent.guest_components_rest_api=all
As usual, command line configurations can be added with annotations.
apiVersion: apps/v1
kind: Deployment
metadata:
  name: nginx
  labels:
    app: nginx
spec:
  replicas: 1
  selector:
    matchLabels:
      app: nginx
  template:
    metadata:
      labels:
        app: nginx
      annotations:
        io.katacontainers.config.hypervisor.kernel_params: "agent.guest_components_rest_api=all"
    spec:
      runtimeClassName: (...)
      containers:
      - name: nginx
        (...)
Attestation
Once enabled, an attestation can be retrieved via the REST API.
curl http://127.0.0.1:8006/aa/evidence?runtime_data=xxxx
The API expects runtime data to be provided. The runtime data will be included in the report. Typically this is used to bind a nonce or the hash of a key to the evidence.
Security
Enabling this feature can make your workload vulnerable to so-called “evidence factory” attacks. By default, different CoCo workloads can have the same TCB, even if they use different container images. This is a design feature, but it means that when the attestation report API is enabled, two workloads could produce interchangeable attestation reports, even if they are operated by different parties.
To make sure someone else cannot generate evidence that could be used with your attestation protocol, configure your guest to differentiate its TCB. For example, use the init-data (which is measured) to specify the public key of the KBS. Init-data is currently only supported with peer pods. More information about it will be added soon.
4.2 - Get Secret Resources
Workloads that request resources from Trustee
Note
Requesting secret resources depends on attestation. Configure attestation before requesting resourcesWhile sealed secrets can be used to store encrypted secret resources as Kubernetes Secrets and have them transparently decrypted using keys from Trustee, a workload can also explicitly request resources via a REST API that is automatically exposed to the pod network namespace.
For example, you can run this command from your container.
curl http://127.0.0.1:8006/cdh/resource/default/key/1
In this example Trustee will fulfill the request for kbs:///default/key/1
assuming that the resource has been provisioned.
4.3 - Authenticated Registries
Use private OCI registries
Context
A user might want to use container images from private OCI registries, hence requiring authentication. The project provides the means to pull protected images from authenticated registry.
Important: ideally the authentication credentials should only be accessible from within a Trusted Execution Environment, however, due some limitations on the architecture of components used by CoCo, the credentials need to be exposed to the host, thus registry authentication is not currently a confidential feature. The community has worked to remediate that limitation and, in meanwhile, we recommend the use of encrypted images as a mitigation.
Instructions
The following steps require a functional CoCo installation on a Kubernetes cluster. A Key Broker Client (KBC) has to be configured for TEEs to be able to retrieve confidential secrets. We assume cc_kbc as a KBC for the CoCo project’s Key Broker Service (KBS) in the following instructions, but authenticated registries should work with other Key Broker implementations in a similar fashion.
Create registry authentication file
The registry authentication file should have the containers-auth.json format, with exception of credential helpers (credHelpers) that aren’t supported. Also it’s not supported glob URLs nor prefix-matched paths as in
Kubernetes interpretation of config.json.
Create the registry authentication file (e.g containers-auth.json) like this:
export AUTHENTICATED_IMAGE="my-registry.local/repository/image:latest"
export AUTHENTICATED_IMAGE_NAMESPACE="$(echo "$AUTHENTICATED_IMAGE" | cut -d':' -f1)"
export AUTHENTICATED_IMAGE_USER="MyRegistryUser"
export AUTHENTICATED_IMAGE_PASSWORD="MyRegistryPassword"
cat <<EOF>> containers-auth.json
{
	"auths": {
		"${AUTHENTICATED_IMAGE_NAMESPACE}": {
			"auth": "$(echo ${AUTHENTICATED_IMAGE_USER}:${AUTHENTICATED_IMAGE_PASSWORD} | base64 -w 0)"
		}
	}
}
EOF
Where:
AUTHENTICATED_IMAGEis the full-qualified image nameAUTHENTICATED_IMAGE_NAMESPACEis the image name without the tagAUTHENTICATED_IMAGE_USERandAUTHENTICATED_IMAGE_PASSWORDare the registry credentials user and password, respectivelyauth’s value is the colon-separated user and password (user:password) credentials string encoded in base64
Provision the registry authentication file
Prior to launching a Pod the registry authentication file needs to be provisioned to the Key Broker’s repository. For a KBS deployment on Kubernetes using the local filesystem as repository storage it would work like this:
export KEY_PATH="default/containers/auth"
kubectl exec deploy/kbs -c kbs -n coco-tenant -- mkdir -p "/opt/confidential-containers/kbs/repository/$(dirname "$KEY_PATH")"
cat containers-auth.json | kubectl exec -i deploy/kbs -c kbs -n coco-tenant -- tee "/opt/confidential-containers/kbs/repository/${KEY_PATH}" > /dev/null
The CoCo infrastructure components need to cooperate with containerd and nydus-snapshotter to pull the container image from TEE. Currently
the nydus-snapshotter needs to fetch the image’s metadata from registry, then authentication credentials are read from a Kubernetes secret
of docker-registry type. So it should be created a secret like this:
export SECRET_NAME="cococred"
kubectl create secret docker-registry "${SECRET_NAME}" --docker-server="https://${AUTHENTICATED_IMAGE_NAMESPACE}" \
    --docker-username="${AUTHENTICATED_IMAGE_USER}" --docker-password="${AUTHENTICATED_IMAGE_PASSWORD}"
Where:
SECRET_NAMEis any secret name
Launch a Pod
Create the pod yaml (e.g. pod-image-auth.yaml) like below and apply it:
export KBS_ADDRESS="172.18.0.3:31731"
export RUNTIMECLASS="kata-qemu-coco-dev"
cat <<EOF>> pod-image-auth.yaml
apiVersion: v1
kind: Pod
metadata:
  name: image-auth-feat
  annotations:
    io.containerd.cri.runtime-handler: ${RUNTIMECLASS}
    io.katacontainers.config.hypervisor.kernel_params: ' agent.image_registry_auth=kbs:///${KEY_PATH} agent.guest_components_rest_api=resource agent.aa_kbc_params=cc_kbc::http://${KBS_ADDRESS}'
spec:
  runtimeClassName: ${RUNTIMECLASS}
  containers:
    - name: test-container
      image: ${AUTHENTICATED_IMAGE}
      imagePullPolicy: Always
      command:
        - sleep
        - infinity
  imagePullSecrets:
    - name: ${SECRET_NAME}
EOF
Where:
KBS_ADDRESSis thehost:portaddress of KBSRUNTIMECLASSis any of available CoCo runtimeclasses (e.g.kata-qemu-tdx,kata-qemu-snp). For this example,kata-qemu-coco-devallows to create CoCo pod on systems without confidential hardware. It should be replaced with a class matching the TEE in use.
What distinguish the pod specification for authenticated registry from a regular CoCo pod is:
- the
agent.image_registry_authproperty inio.katacontainers.config.hypervisor.kernel_paramsannotation indicates the location of the registry authentication file as a resource in the KBS - the
imagePullSecretsas required by nydus-snapshotter
Check the pod gets Running:
kubectl get -f pod-image-auth.yaml
NAME              READY   STATUS    RESTARTS   AGE
image-auth-feat   1/1     Running   0          2m52s
4.4 - Encrypted Images
Procedures to encrypt and consume OCI images in a TEE
Context
A user might want to bundle sensitive data on an OCI (Docker) image. The image layers should only be accessible within a Trusted Execution Environment (TEE).
The project provides the means to encrypt an image with a symmetric key that is released to the TEE only after successful verification and appraisal in a Remote Attestation process. CoCo infrastructure components within the TEE will transparently decrypt the image layers as they are pulled from a registry without exposing the decrypted data outside the boundaries of the TEE.
Instructions
The following steps require a functional CoCo installation on a Kubernetes cluster. A Key Broker Client (KBC) has to be configured for TEEs to be able to retrieve confidential secrets. We assume cc_kbc as a KBC for the CoCo project’s Key Broker Service (KBS) in the following instructions, but image encryption should work with other Key Broker implementations in a similar fashion.
Note
Please ensure you have a recent version of Skopeo (v1.13.3+) installed locally.Encrypt an image
We extend public image with secret data.
docker build -t unencrypted - <<EOF
FROM nginx:stable
RUN echo "something confidential" > /secret
EOF
The encryption key needs to be a 32 byte sequence and provided to the encryption step as base64-encoded string.
KEY_FILE="image_key"
head -c 32 /dev/urandom | openssl enc > "$KEY_FILE"
KEY_B64="$(base64 < $KEY_FILE)"
The key id is a generic resource descriptor used by the key broker to look up secrets in its storage. For KBS this is composed of three segments: $repository_name/$resource_type/$resource_tag
KEY_PATH="/default/image_key/nginx"
KEY_ID="kbs://${KEY_PATH}"
The image encryption logic is bundled and invoked in a container:
git clone https://github.com/confidential-containers/guest-components.git
cd guest-components
docker build -t coco-keyprovider -f ./attestation-agent/docker/Dockerfile.keyprovider .
To access the image from within the container, Skopeo can be used to buffer the image in a directory, which is then made available to the container. Similarly, the resulting encrypted image will be put into an output directory.
mkdir -p oci/{input,output}
skopeo copy docker-daemon:unencrypted:latest dir:./oci/input
docker run -v "${PWD}/oci:/oci" coco-keyprovider /encrypt.sh -k "$KEY_B64" -i "$KEY_ID" -s dir:/oci/input -d dir:/oci/output
We can inspect layer annotations to confirm the expected encryption was applied:
skopeo inspect dir:./oci/output | jq '.LayersData[0].Annotations["org.opencontainers.image.enc.keys.provider.attestation-agent"] | @base64d | fromjson'
Sample output:
{
  "kid": "kbs:///default/image_key/nginx",
  "wrapped_data": "lGaLf2Ge5bwYXHO2g2riJRXyr5a2zrhiXLQnOzZ1LKEQ4ePyE8bWi1GswfBNFkZdd2Abvbvn17XzpOoQETmYPqde0oaYAqVTMcnzTlgdYYzpWZcb3X0ymf9bS0gmMkqO3dPH+Jf4axXuic+ITOKy7MfSVGTLzay6jH/PnSc5TJ2WuUJY2rRtNaTY65kKF2K9YP6mtYBqcHqvPDlFiVNNeTAGv2w1zwaMlgZaSHV+Z1y+xxbOV5e98bxuo6861rMchjCiE7FY37PHD3a5ISogq90=",
  "iv": "Z8bGQL7r6qxSpd4L",
  "wrap_type": "A256GCM"
}
Finally, the resulting encrypted image can be provisioned to an image registry.
ENCRYPTED_IMAGE=some-private.registry.io/coco/nginx:encrypted
skopeo copy dir:./oci/output "docker://${ENCRYPTED_IMAGE}"
Provision image key
Prior to launching a Pod the image key needs to be provisioned to the Key Broker’s repository. For a KBS deployment on Kubernetes using the local filesystem as repository storage it would work like this:
kubectl exec deploy/kbs -- mkdir -p "/opt/confidential-containers/kbs/repository/$(dirname "$KEY_PATH")"
cat "$KEY_FILE" | kubectl exec -i deploy/kbs -- tee "/opt/confidential-containers/kbs/repository/${KEY_PATH}" > /dev/null
Note: If you’re not using KBS deployment using trustee operator additional namespace may be needed
-n coco-tenant.
Launch a Pod
We create a simple deployment using our encrypted image. As the image is being pulled and the CoCo components in the TEE encounter the layer annotations that we saw above, the image key will be retrieved from the Key Broker using the annotated Key ID and the layers will be decrypted transparently and the container should come up.
In this example we default to the Cloud API Adaptor runtime, adjust this depending on the CoCo installation.
kubectl get runtimeclass -o jsonpath='{.items[].handler}'
Sample output:
kata-remote
Export variable:
CC_RUNTIMECLASS=kata-remote
Export KBS address:
KBS_ADDRESS=scheme://host:port
Deploy sample pod:
cat <<EOF> nginx-encrypted.yaml
apiVersion: apps/v1
kind: Deployment
metadata:
  labels:
    app: nginx
  name: nginx-encrypted
spec:
  replicas: 1
  selector:
    matchLabels:
      app: nginx
  template:
    metadata:
      labels:
        app: nginx
      annotations:
        io.katacontainers.config.hypervisor.kernel_params: "agent.aa_kbc_params=cc_kbc::${KBS_ADDRESS}"
        io.containerd.cri.runtime-handler: ${CC_RUNTIMECLASS}
    spec:
      runtimeClassName: ${CC_RUNTIMECLASS}
      containers:
      - image: ${ENCRYPTED_IMAGE}
        name: nginx
        imagePullPolicy: Always
EOF
kubectl apply -f nginx-encrypted.yaml
-
Create file
$HOME/initdata.tomlcat <<EOF> initdata.toml algorithm = "sha256" version = "0.1.1" [data] "aa.toml" = ''' [token_configs] [token_configs.coco_as] url = '${KBS_ADDRESS}' [token_configs.kbs] url = '${KBS_ADDRESS}' ''' "cdh.toml" = ''' socket = 'unix:///run/confidential-containers/cdh.sock' credentials = [] [kbc] name = 'cc_kbc' url = '${KBS_ADDRESS}' ''' EOF -
Export variable:
INIT_DATA_B64=$(cat $HOME/initdata.toml | gzip | base64 -w0) -
Deploy:
cat <<EOF> nginx-encrypted.yaml
apiVersion: apps/v1
kind: Deployment
metadata:
  labels:
    app: nginx
  name: nginx-encrypted
spec:
  replicas: 1
  selector:
    matchLabels:
      app: nginx
  template:
    metadata:
      labels:
        app: nginx
      annotations:
        io.katacontainers.config.runtime.cc_init_data: "${INIT_DATA_B64}"
        io.containerd.cri.runtime-handler: ${CC_RUNTIMECLASS}
    spec:
      runtimeClassName: ${CC_RUNTIMECLASS}
      containers:
      - image: ${ENCRYPTED_IMAGE}
        name: nginx
        imagePullPolicy: Always
EOF
kubectl apply -f nginx-encrypted.yaml
We can confirm that the image key has been retrieved from KBS.
kubectl logs -f deploy/kbs | grep "$KEY_PATH"
[2024-01-23T10:24:52Z INFO  actix_web::middleware::logger] 10.244.0.1 "GET /kbs/v0/resource/default/image_key/nginx HTTP/1.1" 200 530 "-" "attestation-agent-kbs-client/0.1.0" 0.000670
Note: If you’re not using KBS deployment using trustee operator additional namespace may be needed
-n coco-tenant.
Debugging
The encrypted image feature relies on a cascade of other features as building blocks:
- Image decryption is built on secret retrieval from KBS
- Secret retrieval is built on remote attestation
- Remote attestation requires retrieval of hardware evidence from the TEE
All of the above have to work in order to decrypt an encrypted image.
0. Launching with an unencrypted image
Launch the same image with unencrypted layers from the same registry to verify that the image itself is not an issue.
1. Retrieve hardware evidence from TEE
Launch an unencrypted library/nginx deployment named nginx with a CoCo runtime class. Issue kubectl exec deploy/nginx -- curl http://127.0.0.1:8006/aa/evidence\?runtime_data\=xxxx. This should produce a real hardware evidence rendered as JSON. Something like {"svn":"1","report_data":"eHh4eA=="} is not real hardware evidence, it’s a dummy response from the sample attester. Real TEE evidence should be more verbose and contain certificates and measurements.
The reason for not producing real evidence could be a wrong build of Attestation Agent for the TEE that you are attempting to use, or the Confidential VM not exposing the expected interfaces.
Note: In some configurations of the CoCo image the facility to retrieve evidence is disabled by default. For bare-metal CoCo images you can enable it by setting agent.guest_components_rest_api=all on the kernel cmdline (see here).
2. Perform remote attestation
Run kubectl exec deploy/nginx -- curl http://127.0.0.1:8006/aa/token\?token_type\=kbs. This should produce an attestation token. If you don’t receive a token but an error you should inspect your Trustee KBS/AS logs and see whether there was a connection attempt for the CVM and potentially a reason why remote attestation failed.
You can set RUST_LOG=debug as environment variable the Trustee deployment to receive more verbose logs. If the evidence is being sent to KBS, the issue is most likely resolvable on the KBS side and possibly related to the evidence not meeting the expectations for a key release in KBS/AS policies or the requested resource not being available in the KBS.
If you don’t see an attestation attempt in the log of KBS there might be problems with network connectivity between the Confidential VM and the KBS. Note that the Pod and the Guest Components on the CVM might not share the same network namespace. A Pod might be able to reach KBS, but the Attestation Agent on the Confidential VM might not. If you are using HTTPS to reach the KBS, there might be a problem with the certificate provided to the Confidential VM (e.g via Initdata).
3. Retrieve decryption key from KBS
If you have successfully retrieved a token attempt to fetch the symmetric key for the encrypted image, manually and using the image’s key id (kid): kubectl exec deploy/nginx -- curl http://127.0.0.1:8006/cdh/resource/default/images/my-key.
You can find out the kid for a given encrypted image in the a query like this:
$ ANNOTATION="org.opencontainers.image.enc.keys.provider.attestation-agent"
$ skopeo inspect docker://ghcr.io/mkulke/nginx-encrypted@sha256:5a81641ff9363a63c3f0a1417d29b527ff6e155206a720239360cc6c0722696e \
    | jq --arg ann "$ANNOTATION" -r '.LayersData[0].Annotations[$ann] | @base64d | fromjson | .kid'
kbs:///default/image_key/nginx
If the key can be retrieved successfully, verify that the size is exactly 32 bytes and matches the key you used for encrypting the image.
4. Other (desperate) measures
If pulling an encrypted image still doesn’t work after successful retrieval of its encryption key, you might want to purge the node(s). There are bugs in the containerd remote snapshotter implementation that might taint the node with manifests and layers that will interfere with image pulling. The node should be discarded and reinstalled to rule that out.
It might also help to set annotations.io.containerd.cri.runtime-handler: $your-runtime-class in the pod spec, in addition to the runtimeClassName field and ImagePullPolicy: Always to ensure that the image is always pulled from the registry.
4.5 - Local Registries
Pull containers from self-hosted registries
TODO
4.6 - Protected Storage
Add protected volumes to a pod
TODO
4.7 - Sealed Secrets
Generate and deploy protected Kubernetes secrets
Note
Sealed Secrets depend on attestation. Configure attestation before using sealed secrets.Sealed secrets allow confidential information to be stored in the untrusted control plane. Like normal Kubernetes secrets, sealed secrets are orchestrated by the control plane and are transparently provisioned to your workload as environment variables or volumes.
Basic Usage
Here’s how you create a vault secret. There are also envelope secrets, which are described later. Vault secrets are a pointer to resource stored in a KBS, while envelope secrets are wrapped secrets that are unwrapped with a KMS.
Creating a sealed secret
There is a helper tool for sealed secrets in the Guest Components repository.
Clone the repository.
git clone https://github.com/confidential-containers/guest-components.git
Inside the guest-components directory, you can build and run the tool with Cargo.
cargo run -p confidential-data-hub --bin secret
With the tool you can create a secret.
cargo run -p confidential-data-hub --bin secret seal vault --resource-uri kbs:///your/secret/here --provider kbs
A vault secret is fulfilled by retrieving a secret from a KBS inside the guest.
The locator of your secret is specified by resource-uri.
This command should return a base64 string which you will use in the next step.
Note
For vault secrets, the secret-cli tool does not upload your resource to the KBS automatically. In addition to generating the secret string, you must also upload the resource to your KBS.Adding a sealed secret to Kubernetes
Create a secret from your secret string using kubectl.
kubectl create secret generic sealed-secret --from-literal='secret=sealed.fakejwsheader.ewogICAgInZlcnNpb24iOiAiMC4xLjAiLAogICAgInR5cGUiOiAidmF1bHQiLAogICAgIm5hbWUiOiAia2JzOi8vL2RlZmF1bHQvc2VhbGVkLXNlY3JldC90ZXN0IiwKICAgICJwcm92aWRlciI6ICJrYnMiLAogICAgInByb3ZpZGVyX3NldHRpbmdzIjoge30sCiAgICAiYW5ub3RhdGlvbnMiOiB7fQp9Cg==.fakesignature'
Note
Sealed secrets do not currently support integrity protection. This will be added in the future, but for now a fake signature and signature header are included within the secret.When using --from-literal you provide a mapping of secret keys and values.
The secret value should be the string generated in the previous step.
The secret key can be whatever you want, but make sure to use the same one in future steps.
This is separate from the name of the secret.
Deploying a sealed secret to a confidential workload
You can add your sealed secret to a workload yaml file.
You can expose your sealed secret as an environment variable.
apiVersion: v1
kind: Pod
metadata:
  name: sealed-secret-pod
spec:
  runtimeClassName: kata-qemu-coco-dev
  containers:
  - name: busybox
    image: quay.io/prometheus/busybox:latest
    imagePullPolicy: Always
    command: ["echo", "$PROTECTED_SECRET"]
    env:
    - name: PROTECTED_SECRET
      valueFrom:
        secretKeyRef:
          name: sealed-secret
          key: secret
You can also expose your secret as a volume.
apiVersion: v1
kind: Pod
metadata:
  name: secret-test-pod-cc
spec:
  runtimeClassName: kata
  containers:
  - name: busybox
    image: quay.io/prometheus/busybox:latest
    imagePullPolicy: Always
    command: ["cat", "/sealed/secret-value/secret"]
    volumeMounts:
        - name: sealed-secret-volume
          mountPath: "/sealed/secret-value"
  volumes:
    - name: sealed-secret-volume
      secret:
        secretName: sealed-secret
Note
Currently sealed secret volumes must be mounted in the/sealed directory.
Advanced
Envelope Secrets
You can also create envelope secrets. With envelope secrets, the secret itself is included in the secret (unlike a vault secret, which is just a pointer to a secret). In an envelope secret, the secret value is wrapped and can be unwrapped by a KMS. This allows us to support models where the key for unwrapping secrets never leaves the KMS. It also decouples the secret from the KBS.
We currently support two KMSes for envelope secrets. See specific instructions for aliyun kms and eHSM.
4.8 - Signed Images
Procedures to generate and deploy signed OCI images with CoCo
Overview
Encrypted images provide confidentiality, but they do not provide authenticity or integrity. Image signatures provide this additional property, preventing certain types of image tampering, for example.
In this brief guide, we show two tools that can be used to sign container images: cosign and skopeo. The skopeo tool can be used to create both cosign signatures or “simple signatures” (which leverage gpg keys). For our purposes, our skopeo examples will use the simple signing approach. In any case, the general approach is to
- Create keys for signing,
- Sign a newly tagged image, and
- Update the KBS with the public signature key and a security policy.
Creating an Image
Creating Keys
Create a keypair using one of two approaches, cosign or Simple Signing - gpg.
To generate a public-private keypair with cosign, provide your
COSIGN_PASSWORD and use the generate-key-pair action:
$ COSIGN_PASSWORD=just1testing2password3 cosign generate-key-pair
This will create the private and public keys: cosign.key and cosign.pub.
skopeo depends on gpg for a keypair.
To generate a keypair with gpg using default options, use --full-generate-key:
$ gpg --full-generate-key
There are several prompts. A user for test purposes could be:
Github Runner
git@runner.com
just1testing2password3
Then export it. The --export-secret-key option is sufficient for exporting
both the secret and public key. Example command:
$ gpg --export-secret-key F63DB2A1AB7C7F195F698C9ED9582CADF7FBCC5D > github-runner.keys
The keys can later be imported by gpg in a CI system using --batch to avoid
typing the password:
$ gpg --batch --import ./github-runner.keys
When automating CI or test workflows, you can place the password for the key in a plaintext file (when it is safe to do so):
echo just1testing2password3 > git-runner-password.txt
Signing the Image
Sign the image using one of two approaches, cosign or Simple Signing - skopeo.
Use the private key to sign an image.
In this example, we assume that there is a Dockerfile (your_dockerfile below)
for creating an image that you want signed. The workflow is to build the image,
push it to ghcr (which requires docker login), and sign it.
COCO_PKG=confidential-containers/test-container
docker build \
  -t ghcr.io/$(COCO_PKG):cosign-sig \
  -f <your_dockerfile> \
  .
docker push ghcr.io/$(COCO_PKG):cosign-sig
cosign sign --key ./cosign.key ghcr.io/${COCO_PKG}:cosign-sig
Ensure you have a gpg key owned by the user signing the image. See the previous subsection for generating and importing gpg keys.
Sign the image. For example, the following command uses an insecure-policy
to sign a local image called confidential-containers/test-container. It uses
the unsigned tag, and in the process of signing it, creates a new
simple-signed tag.
In this example, the resulting image is pushed to ghcr, which requires docker login:
COCO_PKG=confidential-containers/test-container
skopeo \
  copy \
  --debug \
  --insecure-policy \
  --sign-by git@runner.com \
  --sign-passphrase-file ./git-runner-password.txt \
  docker-daemon:ghcr.io/${COCO_PKG}:unsiged \
  docker://ghcr.io/${COCO_PKG}:simple-signed
Running an Image
Running a workload with a signed image is very similar to running workloads
with unsigned images. The main difference is that for a signed image, you must
provide some details to the KBS. This
security policy tells the KBS which image is signed, the type of its key
signature, and where to find the public key for verifying the signature.
Beyond this, you run the workload as you usually would (e.g. via kubectl apply).
Setting the Security Policy for Signed Images
Register the public key to KBS storage. For example:
mkdir -p ${KBS_DIR_PATH}/data/kbs-storage/default/cosign-key \
  && cp cosign.pub ${KBS_DIR_PATH}/data/kbs-storage/default/cosign-key/1
Edit an image pulling validation policy file.
Here is a sample policy file security-policy.json:
{
    "default": [{"type": "reject"}],
    "transports": {
        "docker": {
            "[REGISTRY_URL]": [
                {
                    "type": "sigstoreSigned",
                    "keyPath": "kbs:///default/cosign-key/1"
                }
            ]
        }
    }
}
Be sure to replace [REGISTRY_URL] with the desired registry URL of the
encrypted image.
Lastly, register the image pulling validation policy file with KBS storage:
mkdir -p ${KBS_DIR_PATH}/data/kbs-storage/default/security-policy
cp security-policy.json ${KBS_DIR_PATH}/data/kbs-storage/default/security-policy/test
See Also
Cosign-GitHub Integration
A good tutorial for cosign and github integration is here. The approach is automated and targets real-world usage. For example, this key-generation step automatically uploads the public key, private key, and key secret to the github repo:
$ GITHUB_TOKEN=ghp_... \
COSIGN_PASSWORD=just1testing2password3 \
cosign generate-key-pair github://<github_username>/<github_repo>
5 - Attestation
Trusted Components for Attestation and Secret Management
Before a confidential workload is granted access to sensitive data, it should be attested. Attestation provides guarantees about the TCB, isolation properties, and root of trust of the enclave.
Confidential Containers uses Trustee to verify attestations and conditionally release secrets. Trustee can be used to attest any confidential workloads. It is especially integrated with Confidential Containers.
Trustee should be deployed in a trusted environment, given that its role validating guests and releasing secrets is inherently sensitive.
There are several ways to configure and deploy Trustee.
Architecture
Trustee is a composition of a few different services, which can be deployed in several different configurations. This figure shows one common way to deploy these components in conjunction with certain guest components.
flowchart LR
    AA -- attests guest ----> KBS
    CDH -- requests resource --> KBS
    subgraph Guest
        CDH <.-> AA
    end
    subgraph Trustee
        KBS -- validates evidence --> AS
        RVPS -- provides reference values--> AS
    end
    client-tool -- configures --> KBS
Components
| Component | Name | Purpose |
|---|---|---|
| KBS | Key Broker Service | Facilitates attestation and conditionally releases secrets |
| AS | Attestation Service | Validates hardware evidence |
| RVPS | Reference Value Provider Service | Manages reference values |
| CDH | Confidential Data Hub | Handles confidential operations in the guest |
| AA | Attestation Agent | Gets hardware evidence in the guest |
KBS Protocol
Trustee and the guest components establish a secure channel in conjunction with attestation. This connection follows the KBS protocol, which is specified here
5.1 - CoCo Setup
Setting up attestation with CoCo
If you are using Trustee with Confidential Containers, you’ll need to point your CoCo workload to your Trustee.
In your pod definition, add the following annotation.
io.katacontainers.config.hypervisor.kernel_params: "agent.aa_kbc_params=cc_kbc::http://<kbs-ip>:<kbs-port>"
The KBS IP will be the address of whatever system you run Trustee on in the next steps. Make sure this is accessible within your guest. Don’t use localhost.
By default the KBS port will be 8080. You can verify this in the next steps.
A full workload definition with the annotation might look like this.
apiVersion: v1
kind: Pod
metadata:
  labels:
    run: nginx
  name: nginx
  annotations:
    io.containerd.cri.runtime-handler: kata-qemu-coco-dev
    io.katacontainers.config.hypervisor.kernel_params: "agent.aa_kbc_params=cc_kbc::http://<kbs-ip>:<kbs-port>"
spec:
  containers:
  - image: bitnami/nginx:1.22.0
    name: nginx
  dnsPolicy: ClusterFirst
  runtimeClassName: kata-qemu-coco-dev
The Trustee address can also be configured via init data.
5.2 - Installation
Installing Trustee
Trustee can be deployed in several different configurations. Either way, Trustee should be deployed in a trusted environment. This could be a local server, some trusted third party, or even another enclave. Official support for deploying Trustee inside of Confidential Containers is being developed.
5.2.1 - Trustee Operator
Installing Trustee on Kubernetes
Trustee can be installed on Kubernetes using the Trustee operator. When running Trustee in Kubernetes with the operator, the cluster must be Trusted.
Install the operator
The operator (release v0.3.0 at the time of writing) is available in the Operator Hub.
Please follow the installation steps detailed here.
Verify that the controller is running.
kubectl get pods -n operators --watch
The operator controller should be running.
NAME                                                   READY   STATUS    RESTARTS   AGE
trustee-operator-controller-manager-77cb448dc-7vxck    1/1     Running   0          11m
How to override the Trustee image
First of all we need to know which Trustee image is running:
kubectl get csv -n operators trustee-operator.v0.3.0 -o json | jq '.spec.install.spec.deployments[0].spec.template.spec.containers[0].env[1].value'
"ghcr.io/confidential-containers/key-broker-service:built-in-as-v0.11.0"
The default image can be replaced with an updated version, for example Trustee v0.12.0:
NEW_IMAGE=ghcr.io/confidential-containers/key-broker-service:built-in-as-v0.12.0
kubectl patch csv -n operators trustee-operator.v0.3.0 --type='json' -p="[{'op': 'replace', 'path': '/spec/install/spec/deployments/0/spec/template/spec/containers/0/env/1/value', 'value':$NEW_IMAGE}]"
Deploy Trustee
An example on how to configure Trustee is provided in this blog.
After the last configuration step, check that the Trustee deployment is running.
kubectl get pods -n operators --selector=app=kbs
The Trustee deployment should be running.
NAME                                  READY   STATUS    RESTARTS   AGE
trustee-deployment-f97fb74d6-w5qsm    1/1     Running   0          25m
Uninstall
Remove the Trustee CRD.
CR_NAME=$(kubectl get kbsconfig -n operators -o=jsonpath='{.items[0].metadata.name}') && kubectl delete KbsConfig $CR_NAME -n operators
Remove the controller.
kubectl delete Subscription -n operators my-trustee-operator
kubectl delete csv -n operators trustee-operator.v0.3.0
5.2.2 - Trustee in Docker
Installing Trustee on Docker compose
Trustee can be installed using Docker Compose.
Installation
Clone the Trustee repo.
git clone https://github.com/confidential-containers/trustee.git
Setup authentication keys.
openssl genpkey -algorithm ed25519 > kbs/config/private.key
openssl pkey -in kbs/config/private.key -pubout -out kbs/config/public.pub
Run Trustee.
docker compose up -d
Uninstall
Stop Trustee.
docker compose down
5.3 - KBS Client Tool
Simple tool to test or configure Key Broker Service and Attestation Service
Trustee can be configured using the KBS Client tool. Other parts of this documentation may assume that this tool is installed.
The KBS Client can also be used inside of an enclave to retrieve resources from Trustee, either for testing, or as part of a confidential workload that does not use Confidential Containers.
When using the KBS Client to retrieve resources, it must be built with an additional feature which is described below.
Generally, the KBS Client should not be used for retrieving secrets from inside a confidential container. Instead see, secret resources.
Install
The KBS Client tool can be installed in two ways.
With ORAS
Pull the KBS Client with ORAS.
oras pull ghcr.io/confidential-containers/staged-images/kbs-client:latest
chmod +x kbs-client
This version of the KBS Client does not support getting resources from inside of an enclave.
From source
Clone the Trustee repo.
git clone https://github.com/confidential-containers/trustee.git
Build the client
cd kbs
make CLI_FEATURES=sample_only cli
sudo make install-cli
The sample_only feature is used to avoid building hardware attesters into the KBS Client.
to retrieve resources.
If you would like to use the KBS Client inside of an enclave to retrieve secrets,
remove the sample_only feature.
This will build the client with all attesters, which will require extra dependencies.
Usage
Other pages show how the client can be used for specific scenarios. In general most commands will have the same form. Here is an example command that sets a resource in the KBS.
kbs-client --url <url-of-kbs> config \
    --auth-private-key <admin-private-key> set-resource \
    --path <resource-name> --resource-file <path-to-resource-file>
URL
All kbs-client commands must take a --url flag.
This should point to the KBS.
Depending on how and where Trustee is deployed, the URL will be different.
For example, if you use the docker compose deployment, the KBS URL
will typically be the IP of your local node with port 8080.
Private Key
All kbs-client config commands must take an --auth-private-key flag.
Configuring the KBS is a privileged operation so the configuration endpoint
must be protected.
The admin private key is usually set before deploying Trustee.
Refer to the installation guide for where your private key is stored,
and point the client to it.
5.4 - Resources
Managing secret resources with Trustee
Trustee, and the KBS in particular, are built around providing secrets to workloads. These secrets are fulfilled by secret backend plugins, the most common of which is the resource plugin. In practice the terms secret and resource are used interchangeably.
There are several ways to configure secret resources.
Identifying Resources
Confidential Containers and Trustee use the Resource URI scheme to identify resources.
A full Resource URI has the form kbs://<kbs_host>:<kbs_port>/<repository>/<type>/<tag>,
but in practice the KBS Host and KBS Port are ignored to avoid coupling a resource
to a particular IP and port.
Instead, resources are typically expressed as
kbs:///<repository>/<type>/<tag>`
Often resources are referred to just as <repository>/<type>/<tag>.
This is what the KBS Client refers to as the resource path.
Providing Resources to Trustee
By default, Trustee supports a few different ways of provisioning resources.
KBS Client
You can use the KBS Client to provision resources.
kbs-client --url <kbs-url> config \
    --auth-private-key <admin-private-key> set-resource \
    --path <resource-path> --resource-file <path-to-resource-file>
For more details about using the KBS Client, refer to the KBS Client page
Filesystem Backend
By default Trustee will store resources on the filesystem. You can provision resources by placing them into the appropriate directory. When using Kubernetes, you can inject a secret like this.
cat "$KEY_FILE" | kubectl exec -i deploy/trustee-deployment -n trustee-operator-system -- tee "/opt/confidential-containers/kbs/repository/${KEY_PATH}" > /dev/null
This approach can be extended to integrate the resource backend with other Kubernetes components.
Operator
If you are using the Trustee operator, you can specify Kubernetes secrets that will be propagated to the resource backend.
A secret can be added like this
kubectl create secret generic kbsres1 --from-literal key1=res1val1 --from-literal key2=res1val2 -n kbs-operator-system
Advanced configurations
There are additional plugins and additional backends for the resource plugin. For example, Trustee can integrate with Azure Key Vault or PKCS11 HSMs.
5.4.1 - Resource Backends
Backends for resource storage
Resource Storage Backend
KBS stores confidential resources through a StorageBackend abstraction specified
by a Rust trait. The StorageBackend interface can be implemented for different
storage backends like e.g. databases or local file systems.
The KBS config file defines which resource backend KBS will use. The default is the local
file system (LocalFs).
Local File System Backend
With the local file system backend default implementation, each resource file maps to a KBS resource URL. The file path to URL conversion scheme is defined below:
| Resource File Path | Resource URL |
|---|---|
file://<$(KBS_REPOSITORY_DIR)>/<repository_name>/<type>/<tag> |
https://<kbs_address>/kbs/v0/resource/<repository_name>/<type>/<tag> |
The KBS root file system resource path is specified in the KBS config file
as well, and the default value is /opt/confidential-containers/kbs/repository.
Aliyun KMS
Alibaba Cloud KMS(a.k.a Aliyun KMS)
can also work as the KBS resource storage backend.
In this mode, resources will be stored with generic secrets in a KMS instance.
One KBS can be configured with a specified KMS instance in repository_config field of KBS launch config.
These materials can be found in KMS instance’s AAP.
When being accessed, a resource URI of kbs:///repo/type/tag will be translated into the generic secret with name tag. Hinting that repo/type field will be ignored.
Pkcs11
The Pkcs11 backend uses Pkcs11 to store plaintext resources in an HSM. Pkcs11 is a broad specification supporting many cryptographic operations. Here we make use only of a small subset of these features. Often with Pkcs11 an HSM is used to wrap and unwrap keys or store wrapped keys. Here we do something simpler. Since the KBS expects resources to be in plaintext, we store these resources in the HSM as secret keys of the generic secret type. This storage backend will provision resource to the HSM in the expected way when a user uploads a resource to the KBS. The user must simply specify the location of an initialized HSM slot. Keys can also be provisioned to the HSM separately but they must have the expected attributes.
The Pkcs11 backend is configured with the following values.
moduleThe module path should point to a binary implementing Pkcs11 for the HSM that you want to use. For example, if you are usingSoftHSM, you might set the module path to/usr/local/lib/softhsm/libsofthsm2.so.slot_indexThe slot index points to the slot in your HSM where the secrets will be stored. The slot must be initialized before starting the KBS. Noslot_indexis set, the first slot will be used.pinThe user password for authenticating a session with the above slot.
5.4.2 - Azure Key Vault Integration
This documentation describes how to mount secrets stored in Azure Key Vault into a KBS deployment
Premise
AKS
We assume an AKS cluster configured with Workload Identity and Key Vault Secrets Provider. The former provides a KBS pod with the privileges to access an Azure Key Vault (AKV) instance. The latter is an implementation of Kubernetes’ Secret Store CSI Driver, mapping secrets from external key vaults into pods. The guides below provide instructions on how to configure a cluster accordingly:
- Use the Azure Key Vault provider for Secrets Store CSI Driver in an Azure Kubernetes Service (AKS) cluster
- Use Microsoft Entra Workload ID with Azure Kubernetes Service (AKS)
AKV
There should be an AKV instance that has been configured with role based access control (RBAC), containing two secrets named coco_one coco_two for the purpose of the example. Find out how to configure your instance for RBAC in the guide below.
Provide access to Key Vault keys, certificates, and secrets with an Azure role-based access control
Note: You might have to toggle between Access Policy and RBAC modes to create your secrets on the CLI or via the Portal if your user doesn’t have the necessary role assignments.
CoCo
While the steps describe a deployment of KBS, the configuration of a Confidential Containers environment is out of scope for this document. CoCo should be configured with KBS as a Key Broker Client (KBC) and the resulting KBS deployment should be available and configured for confidential pods.
Azure environment
Configure your Resource group, Subscription and AKS cluster name. Adjust accordingly:
export SUBSCRIPTION_ID="$(az account show --query id -o tsv)"
export RESOURCE_GROUP=my-group
export KEYVAULT_NAME=kbs-secrets
export CLUSTER_NAME=coco
Instructions
Create Identity
Create a User managed identity for KBS:
az identity create --name kbs -g "$RESOURCE_GROUP"
export KBS_CLIENT_ID="$(az identity show -g "$RESOURCE_GROUP" --name kbs --query clientId -o tsv)"
export KBS_TENANT_ID=$(az aks show --name "$CLUSTER_NAME" --resource-group "$RESOURCE_GROUP" --query identity.tenantId -o tsv)
Assign a role to access secrets:
export KEYVAULT_SCOPE=$(az keyvault show --name "$KEYVAULT_NAME" --query id -o tsv)
az role assignment create --role "Key Vault Administrator" --assignee "$KBS_CLIENT_ID" --scope "$KEYVAULT_SCOPE"
Namespace
By default KBS is deployed into a coco-tenant Namespace:
export NAMESPACE=coco-tenant
kubectl create namespace $NAMESPACE
KBS identity and Service Account
Workload Identity provides individual pods with IAM privileges to access Azure infrastructure resources. An azure identity is bridged to a Service Account using OIDC and Federated Credentials. Those are scoped to a Namespace, we assume we deploy the Service Account and KBS into the default Namespace, adjust accordingly if necessary.
export AKS_OIDC_ISSUER="$(az aks show --resource-group "$RESOURCE_GROUP" --name "$CLUSTER_NAME" --query "oidcIssuerProfile.issuerUrl" -o tsv)"
az identity federated-credential create \
 --name kbsfederatedidentity \
 --identity-name kbs \
 --resource-group "$RESOURCE_GROUP" \
 --issuer "$AKS_OIDC_ISSUER" \
 --subject "system:serviceaccount:${NAMESPACE}:kbs"
Create a Service Account object and annotate it with the identity’s client id.
cat <<EOF> service-account.yaml
apiVersion: v1
kind: ServiceAccount
metadata:
  annotations:
    azure.workload.identity/client-id: ${KBS_CLIENT_ID}
  name: kbs
  namespace: ${NAMESPACE}
EOF
kubectl apply -f service-account.yaml
Secret Provider Class
A Secret Provider Class specifies a set of secrets that should be made available to k8s workloads.
cat <<EOF> secret-provider-class.yaml
apiVersion: secrets-store.csi.x-k8s.io/v1
kind: SecretProviderClass
metadata:
  name: ${KEYVAULT_NAME}
  namespace: ${NAMESPACE}
spec:
  provider: azure
  parameters:
    usePodIdentity: "false"
    clientID: ${KBS_CLIENT_ID}
    keyvaultName: ${KEYVAULT_NAME}
    objects: |
      array:
      - |
        objectName: coco_one
        objectType: secret
      - |
        objectName: coco_two
        objectType: secret
    tenantId: ${KBS_TENANT_ID}
EOF
kubectl create -f secret-provider-class.yaml
Deploy KBS
The default KBS deployment needs to be extended with label annotations and CSI volume. The secrets are mounted into the storage hierarchy default/akv.
git clone https://github.com/confidential-containers/kbs.git
cd kbs
git checkout v0.8.2
cd kbs/config/kubernetes
mkdir akv
cat <<EOF> akv/kustomization.yaml
apiVersion: kustomize.config.k8s.io/v1beta1
kind: Kustomization
namespace: coco-tenant

resources:
- ../base

patches:
- path: patch.yaml
  target:
    group: apps
    kind: Deployment
    name: kbs
    version: v1
EOF
cat <<EOF> akv/patch.yaml
- op: add
  path: /spec/template/metadata/labels/azure.workload.identity~1use
  value: "true"
- op: add
  path: /spec/template/spec/serviceAccountName
  value: kbs
- op: add
  path: /spec/template/spec/containers/0/volumeMounts/-
  value:
    name: secrets
    mountPath: /opt/confidential-containers/kbs/repository/default/akv
    readOnly: true
- op: add
  path: /spec/template/spec/volumes/-
  value:
    name: secrets
    csi:
      driver: secrets-store.csi.k8s.io
      readOnly: true
      volumeAttributes:
        secretProviderClass: ${KEYVAULT_NAME}
EOF
kubectl apply -k akv/
Test
The KBS pod should be running, the pod events should give indication of possible errors. From a confidential pod the AKV secrets should be retrievable via Confidential Data Hub:
$ kubectl exec -it deploy/nginx-coco -- curl http://127.0.0.1:8006/cdh/resource/default/akv/coco_one
a secret
5.5 - Policies
Controlling the KBS with policies
Trustee allows users to create policies that govern when secrets are released. Trustee has two different policies, the resource policies, and the attestation policy, which serve distinct purposes.
Resource policies control which secrets are released and are generally scoped to the workload. Attestation policies define how TCB claims are compared to reference values to determine if the enclave is in a valid state. Generally this policy reflects the enclave boot flow. Both policies use OPA.
Provisioning Policies
Both types of policies can be provisioned with the KBS Client.
kbs-client --url <kbs-url> config \
    --auth-private-key <admin-private-key> set-resource-policy \
    --policy-file <path-to-policy-file>
The attestation policy is set in a similar manner.
kbs-client --url <kbs-url> config \
    --auth-private-key <admin-private-key> set-attestation-policy \
    --policy-file <path-to-policy-file>
Resource Policies
Resource policies, also known as KBS Policies, control whether a resource is released to a guest. The input to the resource policies is the URI of the resource that is being requested and the attestation token which was generated by attestation service for the guest making the request.
Basic Policies
The KBS Client has a few simple policies built into it. You can set one of these policies with a command like this.
./kbs-client --url <kbs-url>
    config --auth-private-key <admin-private-key>
    set-resource-policy --affirming
The built-in policies are --allow-all, --deny-all, --default, --affirming.
These policies are described in more detail below.
The simplest possible policies either allow or reject all requests.
package policy

default allow = true
Allowing all requests is generally not secure. By default the resource policy allows all requests as long as the evidence does not come from the sample attester. This means that some TEE must have been used to request the secret although it makes no guarantees about the TCB. If you are testing Trustee without a TEE (with the sample evidence) the default policy will block all of your requests.
Usually the policy should check if the attestation token represents a valid TCB.
The attestation token is an EAR token, so we can check if it is contraindicated.
The status field in the EAR token represents an AR4SI Trustworthiness Tier.
There are 4 tiers: Contraindicated, Warning, Affirming,
and None.
Ideally secrets should only be released when the token affirms the guest TCB.
package policy
import rego.v1

default allow = false

allow if {
    input["submods"]["cpu"]["ear.status"] == "affirming"
}
Usually the attestation service must be provisioned with reference values to return attestation tokens that are not contraindicated. This is described in upcoming sections.
A more advanced policy could check that the token is not contraindicated and that the enclave is of a certain type. For example, this policy will only allow requests if the evidence is not contraindicated and comes from an SNP guest.
package policy
import rego.v1

default allow = false

allow if {
    input["submods"]["cpu"]["ear.status"] == "affirming"
    input["submods"]["cpu"]["ear.veraison.annotated-evidence"]["snp"]
}
Advanced Policies
The EAR attestation token offers a generic but specific description of the guest TCB status. In addition to whether or not a module (such as the CPU) is contraindicated, an EAR appraisal can address eight different facets of the TCB.
These are instance_identity, configuration, executables, file_system, hardware,
runtime_opaque, storage_opaque, sourced_data.
Not all of these vectors is in scope for confidential containers. See the next section for how these vectors are calculated.
A resource policy can check each of these values. For instance this policy builds on the previous one to make sure that in addition to not being contraindicated, the executables trust vector has a particular claim.
package policy
import rego.v1

default allow = false

allow if {
    input["submods"]["cpu"]["ear.status"] == "affirming"
    input["submods"]["cpu"]["ear.veraison.annotated-evidence"]["snp"]
    input["submods"]["cpu"]["ear.status.executables"] == 2
}
In AR4SI and EAR, numerical trust claims are assigned specific meanings.
For instance, for the executables trust claim the value 2 stands for
“Only a recognized genuine set of approved executables have been loaded during the boot process.”
A full listing of trust vectors and their meanings can be found here.
The policy also takes the requested resource URI as input so the policy can have different behavior depending on which resource is requested.
Here is a basic policy checking which resource is requested.
package policy
import rego.v1

default allowed = false

path := split(data["resource-path"], "/")

allowed if {
    path[0] == "red"
}
This policy only allows requests to certain repositories. This technique can be combined with those above. For instance, you could write a policy that allows different resources on different platforms, or requires different trust claims for different secrets.
package policy
import rego.v1

default allowed = false

path := split(data["resource-path"], "/")

allowed if {
    path[0] == "red"
    input["submods"]["cpu"]["ear.status"] == "affirming"
    input["submods"]["cpu"]["ear.veraison.annotated-evidence"]["snp"]
}

allowed if {
    path[0] == "blue"
    input["submods"]["cpu"]["ear.status"] == "affirming"
    input["submods"]["cpu"]["ear.veraison.annotated-evidence"]["tdx"]
}
Finally, policies can access guest init-data if it has been specified.
Init-data is a measured field set by the host on boot.
Init-data allows dynamic, measured configurations to be propagated to a guest.
Those configurations can also be provided to Trustee as part of the KBS protocol.
If they are, policies can check the init-data, which is located at submods.cpu.ear.veraison.annotated-evidence.init_data_claims.
This is only supported on platforms that have a hardware init-data field
(such as HostData on SEV-SNP or mrconfigid/mrowner/mrownerconfig on TDX).
Accessing init-data from policies can be extremely powerful because users can specify whatever they want to in the init-data. This allows users to create their own schemes for identifying guests. For instance, the init-data could be used to assign each guest a UUID or a workload class.
Attestation Policies
Attestation policies are what the attestation service uses to calculate EAR trust vectors based on the TCB claims extracted from the hardware evidence by the verifiers. Essentially the AS policy defines which parts of the evidence are important and how the evidence should be compared to reference values.
The default attestation policy already defines this relationship for TDX and SNP guests booted by the Kata shim and running Kata guests. If you are using Confidential Containers with these platforms you probably do not need to change this policy. If you are using Trustee to boot different types of guests, you might want to adjust the AS policy to capture your TCB.
Either way, you’ll need to provide the reference values that the policy expects. Take a look at the default policy to see which values are expected. You only need to provision the reference values for the platform that you are using.
5.6 - Reference Values
Managing Reference Values with the RVPS
Reference values are used by the attestation service, to generate an attestation token. More specifically the attestation policy specifies how reference values are compared to TCB claims (extracted from the HW evidence by the attesters).
Provisioning Reference Values
There are multiple ways to provision reference values.
RVPS Tool
The RVPS provides a client tool for providing reference values. This is separate form the KBS Client because the reference value provider might be a different party than the administrator of Trustee.
You can build the RVPS Tool alongside the RVPS.
git clone https://github.com/confidential-containers/trustee
cd trustee/rvps
make
The RVPS generally expects reference values to be delivered via signed messages. For testing, you can create a sample message that is not signed.
cat << EOF > sample
{
    "test-binary-1": [
        "reference-value-1",
        "reference-value-2"
    ],
    "test-binary-2": [
        "reference-value-3",
        "reference-value-4"
    ]
}
EOF
provenance=$(cat sample | base64 --wrap=0)
cat << EOF > message
{
    "version" : "0.1.0",
    "type": "sample",
    "payload": "$provenance"
}
EOF
You can then provision this message to the RVPS using the RVPS Tool
rvps-tool register --path ./message --addr <address-of-rvps>
If you’ve deployed Trustee via docker compose, the RVPS address should be 127.0.0.1:50003.
You can also query which reference values have been registered.
rvps-tool query --addr <address-of-rvps>
This provisioning flow is being refined.
Operator
If you are using the Trustee operator, you can provision reference values through Kubernetes.
kubectl apply -f - << EOF
apiVersion: v1
kind: ConfigMap
metadata:
  name: rvps-reference-values
  namespace: kbs-operator-system
data:
  reference-values.json: |
    [
    ]
EOF
6 - Examples
Example CoCo Deployments
6.1 - AWS
Cloud API Adaptor (CAA) on AWS
This documentation will walk you through setting up CAA (a.k.a. Peer Pods) on AWS Elastic Kubernetes Service (EKS). It explains how to deploy:
- A single worker node Kubernetes cluster using Elastic Kubernetes Service (EKS)
- CAA on that Kubernetes cluster
- An Nginx pod backed by CAA pod VM
Pre-requisites
- Install
awsCLI tool - Install
eksctlCLI tool - Install kubectl by following the instructions here.
- Ensure that the tools
curl,gitandjqare installed.
AWS Preparation
-
Set
AWS_ACCESS_KEY_ID,AWS_SECRET_ACCESS_KEY(orAWS_PROFILE) andAWS_REGIONfor AWS CLI access -
Set the region:
export AWS_REGION="us-east-2"
Note: We have chose region
us-east-2as it has AMD SEV-SNP instances as well as prebuilt pod VM images readily available.
export AWS_REGION="us-east-2"
Note: We have chose region
us-east-2because it has prebuilt pod VM images readily available.
Deploy Kubernetes using EKS
Make changes to the following environment variable as you see fit:
export CLUSTER_NAME="caa-$(date '+%Y%m%b%d%H%M%S')"
export CLUSTER_NODE_TYPE="m5.xlarge"
export CLUSTER_NODE_FAMILY_TYPE="Ubuntu2204"
export SSH_KEY=~/.ssh/id_rsa.pub
Example EKS cluster creation using the default AWS VPC-CNI
eksctl create cluster --name "$CLUSTER_NAME" \
    --node-type "$CLUSTER_NODE_TYPE" \
    --node-ami-family "$CLUSTER_NODE_FAMILY_TYPE" \
    --nodes 1 \
    --nodes-min 0 \
    --nodes-max 2 \
    --node-private-networking \
    --kubeconfig "$CLUSTER_NAME"-kubeconfig
Wait for the cluster to be created.
Allow required network ports
EKS_VPC_ID=$(aws eks describe-cluster --name "$CLUSTER_NAME" \
--query "cluster.resourcesVpcConfig.vpcId" \
--output text)
echo $EKS_VPC_ID

EKS_CLUSTER_SG=$(aws eks describe-cluster --name "$CLUSTER_NAME" \
  --query "cluster.resourcesVpcConfig.clusterSecurityGroupId" \
  --output text)
echo $EKS_CLUSTER_SG

EKS_VPC_CIDR=$(aws ec2 describe-vpcs --vpc-ids "$EKS_VPC_ID" \
--query 'Vpcs[0].CidrBlock' --output text)
echo $EKS_VPC_CIDR

# agent-protocol-forwarder port
aws ec2 authorize-security-group-ingress --group-id "$EKS_CLUSTER_SG" --protocol tcp --port 15150 --cidr "$EKS_VPC_CIDR"

# vxlan port
aws ec2 authorize-security-group-ingress --group-id "$EKS_CLUSTER_SG" --protocol tcp --port 9000 --cidr "$EKS_VPC_CIDR"
aws ec2 authorize-security-group-ingress --group-id "$EKS_CLUSTER_SG" --protocol udp --port 9000 --cidr "$EKS_VPC_CIDR"
Note:
- Port
15150is the default port for CAA to connect to theagent-protocol-forwarderrunning inside the pod VM.- Port
9000is the VXLAN port used by CAA. Ensure it doesn’t conflict with the VXLAN port used by the Kubernetes CNI.
Deploy CAA
Download the CAA deployment artifacts
export CAA_VERSION="0.14.0"
curl -LO "https://github.com/confidential-containers/cloud-api-adaptor/archive/refs/tags/v${CAA_VERSION}.tar.gz"
tar -xvzf "v${CAA_VERSION}.tar.gz"
cd "cloud-api-adaptor-${CAA_VERSION}/src/cloud-api-adaptor"
export CAA_BRANCH="main"
curl -LO "https://github.com/confidential-containers/cloud-api-adaptor/archive/refs/heads/${CAA_BRANCH}.tar.gz"
tar -xvzf "${CAA_BRANCH}.tar.gz"
cd "cloud-api-adaptor-${CAA_BRANCH}/src/cloud-api-adaptor"
This assumes that you already have the code ready to use. On your terminal change directory to the Cloud API Adaptor’s code base.
CAA pod VM image
We have a pre-built debug pod VM image available in us-east-2 for PoCs. You can find the AMI id for the release specific image
by running the following CLI:
export PODVM_AMI_ID=$(aws ec2 describe-images \
    --filters "Name=tag:Name,Values=fedora-mkosi-debug-tee-amd" "Name=tag:Version,Values=${CAA_VERSION}" \
    --query 'Images[*].[ImageId]' \
    --output text)

echo $PODVM_AMI_ID
There are no pre-built pod VM AMI for latest builds. You’ll need to follow these instructions to build the pod VM AMI. Once image build is finished then export image id to the environment variable PODVM_AMI_ID.
If you have made changes to the CAA code that affects the pod VM image and you want to deploy those changes then follow these instructions to build the pod VM AMI. Once image build is finished then export image id to the environment variable PODVM_AMI_ID.
CAA container image
Export the following environment variable to use the latest release image of CAA:
export CAA_IMAGE="quay.io/confidential-containers/cloud-api-adaptor"
export CAA_TAG="v${CAA_VERSION}-amd64"
Export the following environment variable to use the image built by the CAA CI on each merge to main:
export CAA_IMAGE="quay.io/confidential-containers/cloud-api-adaptor"
Find an appropriate tag of pre-built image suitable to your needs here.
export CAA_TAG=""
Caution: You can also use the
latesttag but it is not recommended, because of its lack of version control and potential for unpredictable updates, impacting stability and reproducibility in deployments.
If you have made changes to the CAA code and you want to deploy those changes then follow these instructions to build the container image. Once the image is built export the environment variables CAA_IMAGE and CAA_TAG.
Create the AWS credentials file
cat <<EOF > install/overlays/aws/aws-cred.env
AWS_ACCESS_KEY_ID=${AWS_ACCESS_KEY_ID}
AWS_SECRET_ACCESS_KEY=${AWS_SECRET_ACCESS_KEY}
EOF
Note: The values should be without quotes
Select peer-pods machine type
export PODVM_INSTANCE_TYPE="m6a.large"
export DISABLECVM="false"
Find more AMD SEV-SNP machine types on this AWS documentation.
export PODVM_INSTANCE_TYPE="t3.large"
export DISABLECVM="true"
Populate the kustomization.yaml file
Run the following command to update the kustomization.yaml file:
cat <<EOF > install/overlays/aws/kustomization.yaml
apiVersion: kustomize.config.k8s.io/v1beta1
kind: Kustomization
resources:
- ../../yamls
images:
- name: cloud-api-adaptor
  newName: "${CAA_IMAGE}"
  newTag: "${CAA_TAG}"
generatorOptions:
  disableNameSuffixHash: true
configMapGenerator:
- name: peer-pods-cm
  namespace: confidential-containers-system
  literals:
  - CLOUD_PROVIDER="aws"
  - DISABLECVM="${DISABLECVM}"
  - VXLAN_PORT="9000"
  - PODVM_AMI_ID="${PODVM_AMI_ID}"
  - PODVM_INSTANCE_TYPE="${PODVM_INSTANCE_TYPE}"
secretGenerator:
- name: peer-pods-secret
  namespace: confidential-containers-system
  envs:
    - aws-cred.env
EOF
Deploy CAA on the Kubernetes cluster
Label the cluster nodes with node.kubernetes.io/worker=
for NODE_NAME in $(kubectl get nodes -o jsonpath='{.items[*].metadata.name}'); do
  kubectl label node $NODE_NAME node.kubernetes.io/worker=
done
Deploy the coco operator. Usually it’s the same version as CAA, but it can be adjusted.
export COCO_OPERATOR_VERSION="${CAA_VERSION}"
kubectl apply -k "github.com/confidential-containers/operator/config/release?ref=v${COCO_OPERATOR_VERSION}"
kubectl apply -k "github.com/confidential-containers/operator/config/samples/ccruntime/peer-pods?ref=v${COCO_OPERATOR_VERSION}"
Run the following command to deploy CAA:
kubectl apply -k "install/overlays/aws"
Generic CAA deployment instructions are also described here.
Deploy the Peerpod controller for garbage collecting pod VMs
Change the working directory from cloud-api-adaptor-${CAA_VERSION}/src/cloud-api-adaptor
to cloud-api-adaptor-${CAA_VERSION}/src/peerpod-ctrl
Run the following command to deploy the Peerpod CRD
kubectl apply -k "config/default"
Run sample application
Ensure runtimeclass is present
Verify that the runtimeclass is created after deploying CAA:
kubectl get runtimeclass
Once you can find a runtimeclass named kata-remote then you can be sure that the deployment was successful. A successful deployment will look like this:
$ kubectl get runtimeclass
NAME          HANDLER       AGE
kata-remote   kata-remote   7m18s
Deploy workload
Create an nginx deployment:
cat <<EOF | kubectl apply -f -
apiVersion: apps/v1
kind: Deployment
metadata:
  name: nginx
  namespace: default
spec:
  selector:
    matchLabels:
      app: nginx
  replicas: 1
  template:
    metadata:
      labels:
        app: nginx
    spec:
      runtimeClassName: kata-remote
      containers:
      - name: nginx
        image: nginx
        ports:
        - containerPort: 80
        imagePullPolicy: Always
EOF
Ensure that the pod is up and running:
kubectl get pods -n default
You can verify that the peer pod VM was created by running the following command:
aws ec2 describe-instances --filters "Name=tag:Name,Values=podvm*" \
   --query 'Reservations[*].Instances[*].[InstanceId, Tags[?Key==`Name`].Value | [0]]' --output table
Here you should see the VM associated with the pod nginx.
Note: If you run into problems then check the troubleshooting guide here.
Cleanup
Delete all running pods using the runtimeclass kata-remote. You can use the following command for the same:
kubectl get pods -A -o custom-columns='NAME:.metadata.name,NAMESPACE:.metadata.namespace,RUNTIMECLASS:.spec.runtimeClassName' | grep kata-remote | awk '{print $1, $2}'
Verify that all peer-pod VMs are deleted. You can use the following command to list all the peer-pod VMs
(VMs having prefix podvm) and status:
aws ec2 describe-instances --filters "Name=tag:Name,Values=podvm*" \
--query 'Reservations[*].Instances[*].[InstanceId, Tags[?Key==`Name`].Value | [0], State.Name]' --output table
Delete the EKS cluster by running the following command:
eksctl delete cluster --name=$CLUSTER_NAME
6.2 - Azure
Cloud API Adaptor (CAA) on Azure
This documentation will walk you through setting up CAA (a.k.a. Peer Pods) on Azure Kubernetes Service (AKS). It explains how to deploy:
- A single worker node Kubernetes cluster using Azure Kubernetes Service (AKS)
- CAA on that Kubernetes cluster
- An Nginx pod backed by CAA pod VM
Confidential Containers also supports using Azure Key Vault as a resource backend for Trustee. More info
Pre-requisites
- Install Azure CLI by following instructions here.
- Install kubectl by following the instructions here.
- Ensure that the tools
curl,git,jqandsipcalcare installed.
Azure Preparation
Azure login
There are a bunch of steps that require you to be logged into your Azure account:
az login
Retrieve your subscription ID:
export AZURE_SUBSCRIPTION_ID=$(az account show --query id --output tsv)
Set the region:
export AZURE_REGION="eastus"
Note: We selected the
eastusregion as it not only offers AMD SEV-SNP machines but also has prebuilt pod VM images readily available.
export AZURE_REGION="eastus2"
Note: We selected the
eastus2region as it not only offers Intel TDX machines but also has prebuilt pod VM images readily available.
export AZURE_REGION="eastus"
Note: We have chose region
eastusbecause it has prebuilt pod VM images readily available.
Resource group
Note: Skip this step if you already have a resource group you want to use. Please, export the resource group name in the
AZURE_RESOURCE_GROUPenvironment variable.
Create an Azure resource group by running the following command:
export AZURE_RESOURCE_GROUP="caa-rg-$(date '+%Y%m%b%d%H%M%S')"

az group create \
  --name "${AZURE_RESOURCE_GROUP}" \
  --location "${AZURE_REGION}"
Deploy Kubernetes using AKS
Make changes to the following environment variable as you see fit:
export CLUSTER_NAME="caa-$(date '+%Y%m%b%d%H%M%S')"
export AKS_WORKER_USER_NAME="azuser"
export AKS_RG="${AZURE_RESOURCE_GROUP}-aks"
export SSH_KEY=~/.ssh/id_rsa.pub
Note: Optionally, deploy the worker nodes into an existing Azure Virtual Network (VNet) and subnet by adding the following flag:
--vnet-subnet-id $MY_SUBNET_ID.
Deploy AKS with single worker node to the same resource group you created earlier:
az aks create \
  --resource-group "${AZURE_RESOURCE_GROUP}" \
  --node-resource-group "${AKS_RG}" \
  --name "${CLUSTER_NAME}" \
  --enable-oidc-issuer \
  --enable-workload-identity \
  --location "${AZURE_REGION}" \
  --node-count 1 \
  --node-vm-size Standard_F4s_v2 \
  --nodepool-labels node.kubernetes.io/worker= \
  --ssh-key-value "${SSH_KEY}" \
  --admin-username "${AKS_WORKER_USER_NAME}" \
  --os-sku Ubuntu
Download kubeconfig locally to access the cluster using kubectl:
az aks get-credentials \
  --resource-group "${AZURE_RESOURCE_GROUP}" \
  --name "${CLUSTER_NAME}"
User assigned identity and federated credentials
CAA needs privileges to talk to Azure API. This privilege is granted to CAA by associating a workload identity to the CAA service account. This workload identity (a.k.a. user assigned identity) is given permissions to create VMs, fetch images and join networks in the next step.
Note: If you use an existing AKS cluster it might need to be configured to support workload identity and OpenID Connect (OIDC), please refer to the instructions in this guide.
Start by creating an identity for CAA:
export AZURE_WORKLOAD_IDENTITY_NAME="caa-${CLUSTER_NAME}"

az identity create \
  --name "${AZURE_WORKLOAD_IDENTITY_NAME}" \
  --resource-group "${AZURE_RESOURCE_GROUP}" \
  --location "${AZURE_REGION}"
export USER_ASSIGNED_CLIENT_ID="$(az identity show \
  --resource-group "${AZURE_RESOURCE_GROUP}" \
  --name "${AZURE_WORKLOAD_IDENTITY_NAME}" \
  --query 'clientId' \
  -otsv)"
Networking
The VMs that will host Pods will commonly require access to internet services, e.g. to pull images from a public OCI registry. A discrete subnet can be created next to the AKS cluster subnet in the same VNet. We then attach a NAT gateway with a public IP to that subnet:
export AZURE_VNET_NAME="$(az network vnet list -g ${AKS_RG} --query '[].name' -o tsv)"
export AKS_CIDR="$(az network vnet show -n $AZURE_VNET_NAME -g $AKS_RG --query "subnets[?name == 'aks-subnet'].addressPrefix" -o tsv)"
# 10.224.0.0/16
export MASK="${AKS_CIDR#*/}"
# 16
PEERPOD_CIDR="$(sipcalc $AKS_CIDR -n 2 | grep ^Network | grep -v current | cut -d' ' -f2)/${MASK}"
# 10.225.0.0/16
az network public-ip create -g "$AKS_RG" -n peerpod
az network nat gateway create -g "$AKS_RG" -l "$AZURE_REGION" --public-ip-addresses peerpod -n peerpod
az network vnet subnet create -g "$AKS_RG" --vnet-name "$AZURE_VNET_NAME" --nat-gateway peerpod --address-prefixes "$PEERPOD_CIDR" -n peerpod
export AZURE_SUBNET_ID="$(az network vnet subnet show -g "$AKS_RG" --vnet-name "$AZURE_VNET_NAME" -n peerpod --query id -o tsv)"
AKS resource group permissions
For CAA to be able to manage VMs assign the identity VM and Network contributor roles, privileges to spawn VMs in $AZURE_RESOURCE_GROUP and attach to a VNet in $AKS_RG.
az role assignment create \
  --role "Virtual Machine Contributor" \
  --assignee "$USER_ASSIGNED_CLIENT_ID" \
  --scope "/subscriptions/${AZURE_SUBSCRIPTION_ID}/resourcegroups/${AZURE_RESOURCE_GROUP}"
az role assignment create \
  --role "Reader" \
  --assignee "$USER_ASSIGNED_CLIENT_ID" \
  --scope "/subscriptions/${AZURE_SUBSCRIPTION_ID}/resourcegroups/${AZURE_RESOURCE_GROUP}"
az role assignment create \
  --role "Network Contributor" \
  --assignee "$USER_ASSIGNED_CLIENT_ID" \
  --scope "/subscriptions/${AZURE_SUBSCRIPTION_ID}/resourcegroups/${AKS_RG}"
Create the federated credential for the CAA ServiceAccount using the OIDC endpoint from the AKS cluster:
export AKS_OIDC_ISSUER="$(az aks show \
  --name "${CLUSTER_NAME}" \
  --resource-group "${AZURE_RESOURCE_GROUP}" \
  --query "oidcIssuerProfile.issuerUrl" \
  -otsv)"
az identity federated-credential create \
  --name "caa-${CLUSTER_NAME}" \
  --identity-name "${AZURE_WORKLOAD_IDENTITY_NAME}" \
  --resource-group "${AZURE_RESOURCE_GROUP}" \
  --issuer "${AKS_OIDC_ISSUER}" \
  --subject system:serviceaccount:confidential-containers-system:cloud-api-adaptor \
  --audience api://AzureADTokenExchange
Deploy CAA
Note: If you are using Calico Container Network Interface (CNI) on the Kubernetes cluster, then, configure Virtual Extensible LAN (VXLAN) encapsulation for all inter workload traffic.
Download the CAA deployment artifacts
export CAA_VERSION="0.14.0"
curl -LO "https://github.com/confidential-containers/cloud-api-adaptor/archive/refs/tags/v${CAA_VERSION}.tar.gz"
tar -xvzf "v${CAA_VERSION}.tar.gz"
cd "cloud-api-adaptor-${CAA_VERSION}/src/cloud-api-adaptor"
export CAA_BRANCH="main"
curl -LO "https://github.com/confidential-containers/cloud-api-adaptor/archive/refs/heads/${CAA_BRANCH}.tar.gz"
tar -xvzf "${CAA_BRANCH}.tar.gz"
cd "cloud-api-adaptor-${CAA_BRANCH}/src/cloud-api-adaptor"
This assumes that you already have the code ready to use. On your terminal change directory to the Cloud API Adaptor’s code base.
CAA pod VM image
Export this environment variable to use for the peer pod VM:
export AZURE_IMAGE_ID="/CommunityGalleries/cococommunity-42d8482d-92cd-415b-b332-7648bd978eff/Images/peerpod-podvm-fedora/Versions/${CAA_VERSION}"
An automated job builds the pod VM image each night at 00:00 UTC. You can use that image by exporting the following environment variable:
SUCCESS_TIME=$(curl -s \
  -H "Accept: application/vnd.github+json" \
  "https://api.github.com/repos/confidential-containers/cloud-api-adaptor/actions/workflows/azure-nightly-build.yml/runs?status=success" \
  | jq -r '.workflow_runs[0].updated_at')

export AZURE_IMAGE_ID="/CommunityGalleries/cocopodvm-d0e4f35f-5530-4b9c-8596-112487cdea85/Images/podvm_image0/Versions/$(date -u -jf "%Y-%m-%dT%H:%M:%SZ" "$SUCCESS_TIME" "+%Y.%m.%d" 2>/dev/null || date -d "$SUCCESS_TIME" +%Y.%m.%d)"
Above image version is in the format YYYY.MM.DD, so to use the latest image should be today’s date or yesterday’s date.
If you have made changes to the CAA code that affects the pod VM image and you want to deploy those changes then follow these instructions to build the pod VM image. Once image build is finished then export image id to the environment variable AZURE_IMAGE_ID.
CAA container image
Export the following environment variable to use the latest release image of CAA:
export CAA_IMAGE="quay.io/confidential-containers/cloud-api-adaptor"
export CAA_TAG="v${CAA_VERSION}-amd64"
Export the following environment variable to use the image built by the CAA CI on each merge to main:
export CAA_IMAGE="quay.io/confidential-containers/cloud-api-adaptor"
Find an appropriate tag of pre-built image suitable to your needs here.
export CAA_TAG=""
Caution: You can also use the
latesttag but it is not recommended, because of its lack of version control and potential for unpredictable updates, impacting stability and reproducibility in deployments.
If you have made changes to the CAA code and you want to deploy those changes then follow these instructions to build the container image. Once the image is built export the environment variables CAA_IMAGE and CAA_TAG.
Annotate Service Account
Annotate the CAA Service Account with the workload identity’s CLIENT_ID and make the CAA DaemonSet use workload identity for authentication:
cat <<EOF > install/overlays/azure/workload-identity.yaml
apiVersion: apps/v1
kind: DaemonSet
metadata:
  name: cloud-api-adaptor-daemonset
  namespace: confidential-containers-system
spec:
  template:
    metadata:
      labels:
        azure.workload.identity/use: "true"
---
apiVersion: v1
kind: ServiceAccount
metadata:
  name: cloud-api-adaptor
  namespace: confidential-containers-system
  annotations:
    azure.workload.identity/client-id: "$USER_ASSIGNED_CLIENT_ID"
EOF
Select peer-pods machine type
export AZURE_INSTANCE_SIZE="Standard_DC2as_v5"
export DISABLECVM="false"
Find more AMD SEV-SNP machine types on this Azure documentation.
export AZURE_INSTANCE_SIZE="Standard_DC2es_v5"
export DISABLECVM="false"
Find more Intel TDX machine types on this Azure documentation.
export AZURE_INSTANCE_SIZE="Standard_D2as_v5"
export DISABLECVM="true"
Populate the kustomization.yaml file
Run the following command to update the kustomization.yaml file:
cat <<EOF > install/overlays/azure/kustomization.yaml
apiVersion: kustomize.config.k8s.io/v1beta1
kind: Kustomization
bases:
- ../../yamls
images:
- name: cloud-api-adaptor
  newName: "${CAA_IMAGE}"
  newTag: "${CAA_TAG}"
generatorOptions:
  disableNameSuffixHash: true
configMapGenerator:
- name: peer-pods-cm
  namespace: confidential-containers-system
  literals:
  - CLOUD_PROVIDER="azure"
  - AZURE_SUBSCRIPTION_ID="${AZURE_SUBSCRIPTION_ID}"
  - AZURE_REGION="${AZURE_REGION}"
  - AZURE_INSTANCE_SIZE="${AZURE_INSTANCE_SIZE}"
  - AZURE_RESOURCE_GROUP="${AZURE_RESOURCE_GROUP}"
  - AZURE_SUBNET_ID="${AZURE_SUBNET_ID}"
  - AZURE_IMAGE_ID="${AZURE_IMAGE_ID}"
  - DISABLECVM="${DISABLECVM}"
secretGenerator:
- name: peer-pods-secret
  namespace: confidential-containers-system
- name: ssh-key-secret
  namespace: confidential-containers-system
  files:
  - id_rsa.pub
patchesStrategicMerge:
- workload-identity.yaml
EOF
The SSH public key should be accessible to the kustomization.yaml file:
cp $SSH_KEY install/overlays/azure/id_rsa.pub
Deploy CAA on the Kubernetes cluster
Deploy coco operator. Usually it’s the same version as CAA, but it can be adjusted.
export COCO_OPERATOR_VERSION="${CAA_VERSION}"
kubectl apply -k "github.com/confidential-containers/operator/config/release?ref=v${COCO_OPERATOR_VERSION}"
kubectl apply -k "github.com/confidential-containers/operator/config/samples/ccruntime/peer-pods?ref=v${COCO_OPERATOR_VERSION}"
Run the following command to deploy CAA:
kubectl apply -k "install/overlays/azure"
Generic CAA deployment instructions are also described here.
Deploy the Peerpod controller for garbage collecting pod VMs
Change the working directory from cloud-api-adaptor-${CAA_VERSION}/src/cloud-api-adaptor
to cloud-api-adaptor-${CAA_VERSION}/src/peerpod-ctrl
Run the following command to deploy the Peerpod CRD
kubectl apply -k "config/default"
Run sample application
Ensure runtimeclass is present
Verify that the runtimeclass is created after deploying CAA:
kubectl get runtimeclass
Once you can find a runtimeclass named kata-remote then you can be sure that the deployment was successful. A successful deployment will look like this:
$ kubectl get runtimeclass
NAME          HANDLER       AGE
kata-remote   kata-remote   7m18s
Deploy workload
Create an nginx deployment:
cat <<EOF | kubectl apply -f -
apiVersion: apps/v1
kind: Deployment
metadata:
  name: nginx
  namespace: default
spec:
  selector:
    matchLabels:
      app: nginx
  replicas: 1
  template:
    metadata:
      labels:
        app: nginx
    spec:
      runtimeClassName: kata-remote
      containers:
      - name: nginx
        image: nginx
        ports:
        - containerPort: 80
        imagePullPolicy: Always
EOF
Ensure that the pod is up and running:
kubectl get pods -n default
You can verify that the peer pod VM was created by running the following command:
az vm list \
  --resource-group "${AZURE_RESOURCE_GROUP}" \
  --output table
Here you should see the VM associated with the pod nginx.
Note: If you run into problems then check the troubleshooting guide here.
Pod VM reference values
As part of a Pod VM image build expected PCR measurements are published into an OCI registry.
Pre-requisites
Install ORAS tool to pull the reference values from the OCI registry and GitHub CLI to verify its build provenance.
Verify build provenance
Assert that the measurements have been generated by a trusted build process on the official repository. Specify --format=json to get more details about the build process.
CAA_REPO="confidential-containers/cloud-api-adaptor"
OCI_REGISTRY="ghcr.io/${CAA_REPO}/measurements/azure/podvm:${CAA_VERSION}"
gh attestation verify -R "$CAA_REPO" "oci://${OCI_REGISTRY}"
Retrieve reference values
The PCR values can be used in remote attestation policies to assert the integrity of the PodVM image.
oras pull "$OCI_REGISTRY"
jq -r .measurements.sha256.pcr11 < measurements.json
0x58e8afdf5b105fc6b202eb8e537a9f1512a4b33cd5921171b518645a86ca5a75
Cleanup
If you wish to clean up the whole set up, you can delete the resource group by running the following command:
az group delete \
  --name "${AZURE_RESOURCE_GROUP}" \
  --yes --no-wait
6.3 - Container Launch with SNP Memory Encryption
How to launch a container with SNP Memory Encryption
Container Launch With Memory Encryption
Launch a Confidential Service
To launch a container with SNP memory encryption, the SNP runtime class (kata-qemu-snp) must be specified. A base alpine docker container (Dockerfile) has been previously built for testing purposes. This image has also been prepared with SSH access and provisioned with a SSH public key for validation purposes.
Here is a sample service yaml specifying the SNP runtime class:
kind: Service
apiVersion: v1
metadata:
  name: "confidential-unencrypted"
spec:
  selector:
    app: "confidential-unencrypted"
  ports:
  - port: 22
---
kind: Deployment
apiVersion: apps/v1
metadata:
  name: "confidential-unencrypted"
spec:
  selector:
    matchLabels:
      app: "confidential-unencrypted"
  template:
    metadata:
      labels:
        app: "confidential-unencrypted"
       annotations:
        io.containerd.cri.runtime-handler: kata-qemu-snp
    spec:
      runtimeClassName: kata-qemu-snp
      containers:
      - name: "confidential-unencrypted"
        image: ghcr.io/kata-containers/test-images:unencrypted-nightly
        imagePullPolicy: Always
Save the contents of this yaml to a file called confidential-unencrypted.yaml.
Start the service:
kubectl apply -f confidential-unencrypted.yaml
Check for errors:
kubectl describe pod confidential-unencrypted
If there are no errors in the Events section, then the container has been successfully created with SNP memory encryption.
Validate SNP Memory Encryption
The container dmesg log can be parsed to indicate that SNP memory encryption is enabled and active. The container image defined in the yaml sample above was built with a predefined key that is authorized for SSH access.
Get the pod IP:
pod_ip=$(kubectl get pod -o wide | grep confidential-unencrypted | awk '{print $6;}')
Download and save the SSH private key and set the permissions.
wget https://github.com/kata-containers/kata-containers/raw/main/tests/integration/kubernetes/runtimeclass_workloads/confidential/unencrypted/ssh/unencrypted -O confidential-image-ssh-key

chmod 600 confidential-image-ssh-key
The following command will run a remote SSH command on the container to check if SNP memory encryption is active:
ssh -i confidential-image-ssh-key \
  -o "StrictHostKeyChecking no" \
  -t root@${pod_ip} \
  'dmesg | grep "Memory Encryption Features""'
If SNP is enabled and active, the output should return:
[ 0.150045] Memory Encryption Features active: AMD SNP
6.4 - GCP
Cloud API Adaptor (CAA) on GCP
This documentation will walk you through setting up CAA (a.k.a. Peer Pods) on Google Kubernetes Engine (GKE). It explains how to deploy:
- A single worker node Kubernetes cluster using GKE
- CAA on that Kubernetes cluster
- A sample application backed by a CAA pod VM
Pre-requisites
- Install Required Tools:
- Google Cloud Project:
- Ensure you have a Google Cloud project created.
- Note the Project ID (export it as
GCP_PROJECT_ID).
GCP Preparation
Start by authenticating with Google and choosing your project:
export GCP_PROJECT_ID="YOUR_PROJECT_ID"
gcloud auth login
gcloud config set project ${GCP_PROJECT_ID}
Enable the necessary API:
gcloud services enable container.googleapis.com --project=${GCP_PROJECT_ID}
Create a service account with the necessary permissions:
gcloud iam service-accounts create peerpods \
  --description="Peerpods Service Account" \
  --display-name="Peerpods Service Account"

gcloud projects add-iam-policy-binding ${GCP_PROJECT_ID} \
  --member="serviceAccount:peerpods@${GCP_PROJECT_ID}.iam.gserviceaccount.com" \
  --role="roles/compute.instanceAdmin.v1"

gcloud projects add-iam-policy-binding ${GCP_PROJECT_ID} \
  --member="serviceAccount:peerpods@${GCP_PROJECT_ID}.iam.gserviceaccount.com" \
  --role="roles/iam.serviceAccountUser"
Generate and save the credentials file:
gcloud iam service-accounts keys create \
  ~/.config/gcloud/peerpods_application_key.json \
  --iam-account=peerpods@${GCP_PROJECT_ID}.iam.gserviceaccount.com
export GOOGLE_APPLICATION_CREDENTIALS=~/.config/gcloud/peerpods_application_key.json
Configure additional environment variables that will be used later.
Set the region:
export GCP_REGION="us-central1"
Note
“us-central1” was chosen because supports Confidential VMs. For a complete list of supported regions visit https://cloud.google.com/confidential-computing/confidential-vm/docs/supported-configurations#supported-zonesSet the PodVM instance type:
export PODVM_INSTANCE_TYPE="n2d-standard-4"
export DISABLECVM=false
export GCP_CONFIDENTIAL_TYPE="SEV" # SEV or SEV_SNP
export GCP_DISK_TYPE="pd-standard"
export PODVM_INSTANCE_TYPE="c3-standard-4"
export DISABLECVM=false
export GCP_CONFIDENTIAL_TYPE="TDX"
export GCP_DISK_TYPE="pd-balanced"
export PODVM_INSTANCE_TYPE="e2-medium"
export DISABLECVM=true
export GCP_CONFIDENTIAL_TYPE=""
export GCP_DISK_TYPE="pd-standard"
Deploy Kubernetes Using GKE
Deploy a single node Kubernetes cluster using GKE:
gcloud container clusters create my-cluster \
  --zone ${GCP_REGION}-a \
  --machine-type "e2-standard-4" \
  --image-type UBUNTU_CONTAINERD \
  --num-nodes 1
Label the worker nodes:
kubectl get nodes --selector='!node-role.kubernetes.io/master' -o name | \
xargs -I{} kubectl label {} node.kubernetes.io/worker=
Note
Starting with GKE version 1.27, GCP configures containerd with the discard_unpacked_layers=true flag to optimize disk
usage by removing compressed image layers after they are unpacked. However, this can cause issues with PeerPods,
as the workload may fail to locate required layers.
To avoid this, disable the discard_unpacked_layers setting in the containerd configuration.
If you encounter problem with VM’s not running check Troubleshooting section on this page.
Configure VPC network
We need to make sure port 15150 is open under the default VPC network:
gcloud compute firewall-rules create allow-port-15150 \
    --project=${GCP_PROJECT_ID} \
    --network=default \
    --allow=tcp:15150
For production scenarios, it is advisable to restrict the source IP range to minimize security risks. For example, you can restrict the source range to a specific IP address or CIDR block:
gcloud compute firewall-rules create allow-port-15150-restricted \
   --project=${PROJECT_ID} \
   --network=default \
   --allow=tcp:15150 \
   --source-ranges=[YOUR_EXTERNAL_IP]
Deploy the CoCo Operator with Peerpods Runtime
Deploy the CoCo operator. Usually it’s the same version as CAA, but it can be adjusted.
export CAA_VERSION="0.14.0"
export COCO_OPERATOR_VERSION="${CAA_VERSION}"

kubectl apply -k "github.com/confidential-containers/operator/config/release?ref=v${COCO_OPERATOR_VERSION}"
kubectl apply -k "github.com/confidential-containers/operator/config/samples/ccruntime/peer-pods?ref=v${COCO_OPERATOR_VERSION}"
Deploy the Cloud API Adaptor (CAA)
Download the CAA Deployment Artifacts
export CAA_VERSION="0.14.0"
curl -LO "https://github.com/confidential-containers/cloud-api-adaptor/archive/refs/tags/v${CAA_VERSION}.tar.gz"
tar -xvzf "v${CAA_VERSION}.tar.gz"
cd "cloud-api-adaptor-${CAA_VERSION}/src/cloud-api-adaptor"
export CAA_BRANCH="main"
curl -LO "https://github.com/confidential-containers/cloud-api-adaptor/archive/refs/heads/${CAA_BRANCH}.tar.gz"
tar -xvzf "${CAA_BRANCH}.tar.gz"
cd "cloud-api-adaptor-${CAA_BRANCH}/src/cloud-api-adaptor"
This assumes that you already have the code ready to use. On your terminal change directory to the Cloud API Adaptor’s code base.
Configure the CAA PodVM image
Export this environment variable to use for the PodVM:
export PODVM_IMAGE_ID="/projects/it-cloud-gcp-prod-osc-devel/global/images/fedora-mkosi-tee-amd-1-11-0"
There are no pre-built PodVM image for latest builds. You’ll need to follow
these
instructions
to build the PodVM image. Once image build is finished then export image id to
the environment variable PODVM_IMAGE_ID.
If you have made changes to the CAA code that affects the pod VM image and you
want to deploy those changes then follow these
instructions
to build the PodVM image. Once image build is finished then export image id to
the environment variable PODVM_IMAGE_ID.
Configure the CAA container image
Export the following environment variable to use the latest release image of CAA:
export CAA_IMAGE="quay.io/confidential-containers/cloud-api-adaptor"
export CAA_TAG="v${CAA_VERSION}-amd64"
Export the following environment variable to use the image built by the CAA CI on each merge to main:
export CAA_IMAGE="quay.io/confidential-containers/cloud-api-adaptor"
Find an appropriate tag of pre-built image suitable to your needs here.
export CAA_TAG=""
Caution: You can also use the
latesttag but it is not recommended, because of its lack of version control and potential for unpredictable updates, impacting stability and reproducibility in deployments.
If you have made changes to the CAA code and you want to deploy those changes
then follow these
instructions
to build the container image. Once the image is built export the environment
variables CAA_IMAGE and CAA_TAG.
Create the GCP credentials file
Copy the Application Credentials to the GCP overlay folder:
cp $GOOGLE_APPLICATION_CREDENTIALS install/overlays/gcp/GCP_CREDENTIALS
Populate the kustomization.yaml file
Run the following command to update the
kustomization.yaml
file:
cat <<EOF > install/overlays/gcp/kustomization.yaml
apiVersion: kustomize.config.k8s.io/v1beta1
kind: Kustomization

resources:
- ../../yamls

images:
- name: cloud-api-adaptor
  newName: "${CAA_IMAGE}"
  newTag: "${CAA_TAG}"

generatorOptions:
  disableNameSuffixHash: true

configMapGenerator:
- name: peer-pods-cm
  namespace: confidential-containers-system
  literals:
  - CLOUD_PROVIDER="gcp"
  - PODVM_IMAGE_NAME="${PODVM_IMAGE_ID}"
  - GCP_PROJECT_ID="${GCP_PROJECT_ID}"
  - GCP_ZONE="${GCP_REGION}-a"
  - GCP_MACHINE_TYPE="${PODVM_INSTANCE_TYPE}"
  - DISABLECVM="${DISABLECVM}"
  - GCP_NETWORK="global/networks/default"
  - GCP_CONFIDENTIAL_TYPE="${GCP_CONFIDENTIAL_TYPE}"
  - GCP_DISK_TYPE="${GCP_DISK_TYPE}"
secretGenerator:
- name: peer-pods-secret
  namespace: confidential-containers-system
  files:
  - GCP_CREDENTIALS
EOF
Deploy CAA on the Kubernetes cluster
Run the following command to deploy CAA:
kubectl apply -k "install/overlays/gcp"
Verify the deployment:
kubectl get pods -n confidential-containers-system
Verify that the runtimeclass is created after deploying CAA:
kubectl get runtimeclass
Once you can find a runtimeclass named kata-remote then you can be sure
that the deployment was successful. A successful deployment will look like
this:
$ kubectl get runtimeclass
NAME          HANDLER       AGE
kata-remote   kata-remote   7m18s
Generic CAA deployment instructions are also described here.
Deploy the Peerpod controller for garbage collecting pod VMs
Change the working directory from cloud-api-adaptor-${CAA_VERSION}/src/cloud-api-adaptor
to cloud-api-adaptor-${CAA_VERSION}/src/peerpod-ctrl
Run the following command to deploy the Peerpod CRD
kubectl apply -k "config/default"
Run a sample application
This example showcases a more advanced deployment using TEE and confidential VMs with the kata-remote runtime class. It demonstrates how to deploy a sample pod and retrieve a secret securely within a confidential computing environment.
Prepare the init data configuration
Peerpods now supports init data, you can pass the required configuration files
(aa.toml, cdh.toml, and policy.rego) via the
io.katacontainers.config.runtime.cc_init_data annotation. Below is an example
of the configuration and usage.
# initdata.toml
algorithm = "sha384"
version = "0.1.0"

[data]
"aa.toml" = '''
[token_configs]
[token_configs.coco_as]
url = 'http://127.0.0.1:8080'

[token_configs.kbs]
url = 'http://127.0.0.1:8080'
cert = """
-----BEGIN CERTIFICATE-----
MIIDljCCAn6gAwIBAgIUR/UNh13GFam4emgludtype/S9BIwDQYJKoZIhvcNAQEL
BQAwdTELMAkGA1UEBhMCQ04xETAPBgNVBAgMCFpoZWppYW5nMREwDwYDVQQHDAhI
YW5nemhvdTERMA8GA1UECgwIQUFTLVRFU1QxFDASBgNVBAsMC0RldmVsb3BtZW50
MRcwFQYDVQQDDA5BQVMtVEVTVC1IVFRQUzAeFw0yNDAzMTgwNzAzNTNaFw0yNTAz
MTgwNzAzNTNaMHUxCzAJBgNVBAYTAkNOMREwDwYDVQQIDAhaaGVqaWFuZzERMA8G
A1UEBwwISGFuZ3pob3UxETAPBgNVBAoMCEFBUy1URVNUMRQwEgYDVQQLDAtEZXZl
bG9wbWVudDEXMBUGA1UEAwwOQUFTLVRFU1QtSFRUUFMwggEiMA0GCSqGSIb3DQEB
AQUAA4IBDwAwggEKAoIBAQDfp1aBr6LiNRBlJUcDGcAbcUCPG6UzywtVIc8+comS
ay//gwz2AkDmFVvqwI4bdp/NUCwSC6ShHzxsrCEiagRKtA3af/ckM7hOkb4S6u/5
ewHHFcL6YOUp+NOH5/dSLrFHLjet0dt4LkyNBPe7mKAyCJXfiX3wb25wIBB0Tfa0
p5VoKzwWeDQBx7aX8TKbG6/FZIiOXGZdl24DGARiqE3XifX7DH9iVZ2V2RL9+3WY
05GETNFPKtcrNwTy8St8/HsWVxjAzGFzf75Lbys9Ff3JMDsg9zQzgcJJzYWisxlY
g3CmnbENP0eoHS4WjQlTUyY0mtnOwodo4Vdf8ZOkU4wJAgMBAAGjHjAcMBoGA1Ud
EQQTMBGCCWxvY2FsaG9zdIcEfwAAATANBgkqhkiG9w0BAQsFAAOCAQEAKW32spii
t2JB7C1IvYpJw5mQ5bhIlldE0iB5rwWvNbuDgPrgfTI4xiX5sumdHw+P2+GU9KXF
nWkFRZ9W/26xFrVgGIS/a07aI7xrlp0Oj+1uO91UhCL3HhME/0tPC6z1iaFeZp8Y
T1tLnafqiGiThFUgvg6PKt86enX60vGaTY7sslRlgbDr9sAi/NDSS7U1PviuC6yo
yJi7BDiRSx7KrMGLscQ+AKKo2RF1MLzlJMa1kIZfvKDBXFzRd61K5IjDRQ4HQhwX
DYEbQvoZIkUTc1gBUWDcAUS5ztbJg9LCb9WVtvUTqTP2lGuNymOvdsuXq+sAZh9b
M9QaC1mzQ/OStg==
-----END CERTIFICATE-----
"""
'''

"cdh.toml"  = '''
socket = 'unix:///run/confidential-containers/cdh.sock'
credentials = []

[kbc]
name = 'cc_kbc'
url = 'http://1.2.3.4:8080'
kbs_cert = """
-----BEGIN CERTIFICATE-----
MIIFTDCCAvugAwIBAgIBADBGBgkqhkiG9w0BAQowOaAPMA0GCWCGSAFlAwQCAgUA
oRwwGgYJKoZIhvcNAQEIMA0GCWCGSAFlAwQCAgUAogMCATCjAwIBATB7MRQwEgYD
VQQLDAtFbmdpbmVlcmluZzELMAkGA1UEBhMCVVMxFDASBgNVBAcMC1NhbnRhIENs
YXJhMQswCQYDVQQIDAJDQTEfMB0GA1UECgwWQWR2YW5jZWQgTWljcm8gRGV2aWNl
czESMBAGA1UEAwwJU0VWLU1pbGFuMB4XDTIzMDEyNDE3NTgyNloXDTMwMDEyNDE3
NTgyNlowejEUMBIGA1UECwwLRW5naW5lZXJpbmcxCzAJBgNVBAYTAlVTMRQwEgYD
VQQHDAtTYW50YSBDbGFyYTELMAkGA1UECAwCQ0ExHzAdBgNVBAoMFkFkdmFuY2Vk
IE1pY3JvIERldmljZXMxETAPBgNVBAMMCFNFVi1WQ0VLMHYwEAYHKoZIzj0CAQYF
K4EEACIDYgAExmG1ZbuoAQK93USRyZQcsyobfbaAEoKEELf/jK39cOVJt1t4s83W
XM3rqIbS7qHUHQw/FGyOvdaEUs5+wwxpCWfDnmJMAQ+ctgZqgDEKh1NqlOuuKcKq
2YAWE5cTH7sHo4IBFjCCARIwEAYJKwYBBAGceAEBBAMCAQAwFwYJKwYBBAGceAEC
BAoWCE1pbGFuLUIwMBEGCisGAQQBnHgBAwEEAwIBAzARBgorBgEEAZx4AQMCBAMC
AQAwEQYKKwYBBAGceAEDBAQDAgEAMBEGCisGAQQBnHgBAwUEAwIBADARBgorBgEE
AZx4AQMGBAMCAQAwEQYKKwYBBAGceAEDBwQDAgEAMBEGCisGAQQBnHgBAwMEAwIB
CDARBgorBgEEAZx4AQMIBAMCAXMwTQYJKwYBBAGceAEEBEDDhCejDUx6+dlvehW5
cmmCWmTLdqI1L/1dGBFdia1HP46MC82aXZKGYSutSq37RCYgWjueT+qCMBE1oXDk
d1JOMEYGCSqGSIb3DQEBCjA5oA8wDQYJYIZIAWUDBAICBQChHDAaBgkqhkiG9w0B
AQgwDQYJYIZIAWUDBAICBQCiAwIBMKMDAgEBA4ICAQACgCai9x8DAWzX/2IelNWm
ituEBSiq9C9eDnBEckQYikAhPasfagnoWFAtKu/ZWTKHi+BMbhKwswBS8W0G1ywi
cUWGlzigI4tdxxf1YBJyCoTSNssSbKmIh5jemBfrvIBo1yEd+e56ZJMdhN8e+xWU
bvovUC2/7Dl76fzAaACLSorZUv5XPJwKXwEOHo7FIcREjoZn+fKjJTnmdXce0LD6
9RHr+r+ceyE79gmK31bI9DYiJoL4LeGdXZ3gMOVDR1OnDos5lOBcV+quJ6JujpgH
d9g3Sa7Du7pusD9Fdap98ocZslRfFjFi//2YdVM4MKbq6IwpYNB+2PCEKNC7SfbO
NgZYJuPZnM/wViES/cP7MZNJ1KUKBI9yh6TmlSsZZOclGJvrOsBZimTXpATjdNMt
cluKwqAUUzYQmU7bf2TMdOXyA9iH5wIpj1kWGE1VuFADTKILkTc6LzLzOWCofLxf
onhTtSDtzIv/uel547GZqq+rVRvmIieEuEvDETwuookfV6qu3D/9KuSr9xiznmEg
xynud/f525jppJMcD/ofbQxUZuGKvb3f3zy+aLxqidoX7gca2Xd9jyUy5Y/83+ZN
bz4PZx81UJzXVI9ABEh8/xilATh1ZxOePTBJjN7lgr0lXtKYjV/43yyxgUYrXNZS
oLSG2dLCK9mjjraPjau34Q==
-----END CERTIFICATE-----
"""
'''

"policy.rego" = '''
package agent_policy

import future.keywords.in
import future.keywords.every

import input

# Default values, returned by OPA when rules cannot be evaluated to true.
default CopyFileRequest := true
default CreateContainerRequest := true
default CreateSandboxRequest := true
default DestroySandboxRequest := true
default ExecProcessRequest := false
default GetOOMEventRequest := true
default GuestDetailsRequest := true
default OnlineCPUMemRequest := true
default PullImageRequest := true
default ReadStreamRequest := false
default RemoveContainerRequest := true
default RemoveStaleVirtiofsShareMountsRequest := true
default SignalProcessRequest := true
default StartContainerRequest := true
default StatsContainerRequest := true
default TtyWinResizeRequest := true
default UpdateEphemeralMountsRequest := true
default UpdateInterfaceRequest := true
default UpdateRoutesRequest := true
default WaitProcessRequest := true
default WriteStreamRequest := false
'''
Make sure you have the right policy and KBC URL is pointing to your Key Broker Service.
Now, encode the initdata.toml and store it in a variable
INITDATA=$(cat initdata.toml | gzip | base64 -w0)
Deploy the pod with:
cat <<EOF | kubectl apply -f -
apiVersion: v1
kind: Pod
metadata:
  name: example-pod
  annotations:
    io.katacontainers.config.runtime.cc_init_data: "$INITDATA"
spec:
  runtimeClassName: kata-remote
  containers:
    - name: example-container
      image: alpine:latest
      command:
        - sleep
        - "3600"
      securityContext:
        privileged: false
        seccompProfile:
          type: RuntimeDefault
EOF
Fetching Secrets from Trustee
Once the pod is successfully deployed with the initdata, you can retrieve
secrets from the Trustee service running inside the pod. Use the following
command to fetch a specific secret:
kubectl exec -it example-pod -- curl http://127.0.0.1:8006/cdh/resource/default/kbsres1/key1
This example demonstrates how to verify if CAA is successfully starting the PodVM within the cloud provider. It is the simplest example available for deployment.
Create an nginx deployment:
cat <<EOF | kubectl apply -f -
apiVersion: apps/v1
kind: Deployment
metadata:
  name: nginx
  namespace: default
spec:
  selector:
    matchLabels:
      app: nginx
  replicas: 1
  template:
    metadata:
      labels:
        app: nginx
    spec:
      runtimeClassName: kata-remote
      containers:
      - name: nginx
        image: nginx
        ports:
        - containerPort: 80
        imagePullPolicy: Always
EOF
Ensure that the pod is up and running:
kubectl get pods -n default
You can verify that the PodVM was created by running the following command:
gcloud compute instances list
Here you should see the VM associated with the pod used by the example above.
Note: If you run into problems then check the troubleshooting guide here.
Cleanup
Delete all running pods using the runtimeclass kata-remote. You can use the
following command for the same:
kubectl get pods -A -o custom-columns='NAME:.metadata.name,NAMESPACE:.metadata.namespace,RUNTIMECLASS:.spec.runtimeClassName' | grep kata-remote | awk '{print $1, $2}'
Verify that all peer-pod VMs are deleted. You can use the following command to
list all the peer-pod VMs (VMs having prefix podvm) and status:
gcloud compute instances list \
  --filter="name~'podvm.*'" \
  --format="table(name,zone,status)"
Delete the GKE cluster by running the following command:
gcloud container clusters delete my-cluster --zone ${GCP_REGION}-a
Troubleshooting
VM Doesn’t Start
Starting with GKE version 1.27, GCP configures containerd with the discard_unpacked_layers=true flag to optimize disk
usage by removing compressed image layers after they are unpacked. However, this can cause issues with PeerPods,
as the workload may fail to locate required layers.
To avoid this, disable the discard_unpacked_layers setting in the containerd configuration.
Most of the time you will see a generic message such as the following:
Error: failed to create containerd container: error unpacking image: failed to extract layer sha256:<SHA>: failed to get reader from content store: content digest sha256:<SHA>: not found
To disable the discard_unpacked_layers setting in the containerd configuration on Google Kubernetes Engine (GKE) version 1.27 or later, follow these steps:
- SSH to worker node Google console
- Run command
sudo sed -i 's/discard_unpacked_layers = true/discard_unpacked_layers = false/' /etc/containerd/config.toml - Verify changed property
sudo cat /etc/containerd/config.toml | grep discard_unpacked_layers - Restart containerd
sudo systemctl restart containerd
7 - Use Cases
Common Applications of Confidential Containers
7.1 - Confidential AI
Confidential Containers for AI
Coming soon
7.2 - Switchboard Oracles: Securing Web3 Data with Confidential Containers
How Switchboard leverages Confidential Containers to create a secure, decentralized oracle network for Web3 applications
Overview
Switchboard is building a decentralized oracle network that provides secure, reliable, and verifiable data for Web3 applications. By leveraging Confidential Containers (CoCo) with AMD SEV-SNP technology, Switchboard has created a robust infrastructure that protects sensitive oracle data from privileged attackers while ensuring verifiable attestation for blockchain applications.
Challenge
Oracles serve as critical infrastructure in the blockchain ecosystem, providing external data to smart contracts. However, they face unique security challenges:
- Data Integrity: Ensuring data remains unaltered from source to blockchain
- Confidentiality: Protecting sensitive data from manipulation during processing
- Privileged Access Threats: Defending against potential attacks from system administrators or cloud providers
- Verifiable Trust: Providing cryptographic proof that data processing occurs in a secure environment
Traditional container solutions couldn’t provide the level of isolation and attestation required for Switchboard’s security model.
Solution
Switchboard implemented Confidential Containers with AMD SEV-SNP to create a trusted execution environment for their oracle infrastructure:
- Hardware-Level Memory Encryption: Using AMD EPYC CPUs with SEV-SNP to encrypt memory contents, protecting data-in-use from privileged attackers
- Remote Attestation: Providing cryptographic verification that oracle code runs in a genuine, unmodified confidential environment
- Confidential Containers Integration: Building on Kata Containers’ isolation while adding confidential computing capabilities
- Decentralized Infrastructure: Enabling trusted node partners to run Switchboard infrastructure while maintaining security guarantees
Business Benefits
- Enhanced Security Posture: Protection against infrastructure-level attacks, reducing the attack surface for oracle data
- Verifiable Trust: Ability to cryptographically prove to users and partners that data processing occurs in a secure environment
- Competitive Advantage: Offering higher security guarantees than traditional oracle solutions
- Simplified Compliance: Helping meet regulatory requirements for sensitive data handling in Web3 applications
- Partner Network Growth: Enabling secure decentralization through the Node Partners program
Future Roadmap
Switchboard is expanding its confidential computing capabilities with planned support for Intel TDX, further broadening hardware compatibility options for node partners. This multi-architecture approach ensures the oracle network can scale securely across diverse infrastructure environments.
Conclusion
By implementing Confidential Containers with AMD SEV-SNP, Switchboard has established a new security standard for Web3 oracles. This infrastructure provides the foundation for Switchboard’s Node Partners program, launching on mainnet on March 11, 2025, enabling a truly decentralized and secure oracle network that Web3 applications can trust with their most sensitive data needs.
7.3 - Secure Supply Chain
Securing build piplines with Confidential Containers
Coming soon
8 - Troubleshooting
Recovering from misconfigurations and bugs
Troubleshooting
Confidential Containers integrates several components. If you run into problems, it can sometimes be difficult to figure out what is going on or how to move forward. Here are some tips.
If you get stuck or find a bug, please make an issue on this repository or the repository for the component in question, e.g., the operator.
Kubernetes
To figure out which basic area you problem is in, first make sure that your Kubernetes
cluster can schedule non-confidential workloads on your worker node. Remove the kata-*
runtime class from your pod yaml and try to run a pod. If your pod still doesn’t run,
please refer to a more general Kubernetes troubleshooting guide.
If your cluster is healthy but you cannot start confidential containers, you might
be able get some helpful information from Kubernetes.
Try kubectl describe pod <your-pod>
Sometimes this will give you a useful message pointing to a failed attestation
or some sort of missing environment setup. Most of the time you will see a
generic message such as the following:
Failed to create pod sandbox: rpc error: code = Unknown desc = failed to create containerd task: failed to create shim: Failed to Check if grpc server is working: rpc error: code = DeadlineExceeded desc = timed out connecting to vsock 637456061:1024: unknown
Unfortunately, because this is a generic message, you’ll need to go deeper to figure out what is going on.
Debug container
It can be quite useful to start a debug container, usually kubernetes nodes are stripped / hardened, which means no tools are installed, a debug container can be any image.
Debug container
kubectl debug node/dev01-worker -it --image=busybox
When in a debug container host system are mounted under /host
Edit containerd config
vi /host/etc/containerd/config.toml
If chroot’ed, there’s no access to debug containers tools etc
Show containerd log
chroot /host
journalctl -xeu containerd
Edit kata containerd 2.0 config
vi /host/opt/kata/containerd/config.d/kata-deploy.toml
Edit qemu-coco-dev config
vi /host/opt/kata/share/defaults/kata-containers/configuration-qemu-coco-dev.toml
CoCo Debugging
A good next step is to figure out if things are breaking before or after the VM boots. You can see if there is a hypervisor process running with something like this.
ps -ef | grep qemu
If you are using a different hypervisor, adjust your command accordingly. If there are no hypervisor processes running on the worker node, the VM has either failed to start or was shutdown. If there is a hypervisor process, the problem is probably inside the guest.
Now is a good time to enable debug output for Kata and containerd.
To do this, first look at the containerd config file located at
/etc/containerd/config.toml. At the bottom of the file there should
be a section for each runtime class. For example:
[plugins."io.containerd.grpc.v1.cri".containerd.runtimes.kata-qemu-sev]
  cri_handler = "cc"
  runtime_type = "io.containerd.kata-qemu-sev.v2"
  privileged_without_host_devices = true
  pod_annotations = ["io.katacontainers.*"]
  [plugins."io.containerd.grpc.v1.cri".containerd.runtimes.kata-qemu-sev.options]
    ConfigPath = "/opt/confidential-containers/share/defaults/kata-containers/configuration-qemu-sev.toml"
The ConfigPath entry on the final line shows the path to the Kata configuration file that will be used
for that runtime class.
While you are looking at the containerd config, find the [debug] section near the top and set level
to debug. Make sure to restart containerd after editing the containerd config file.
You can do this with sudo systemctl restart containerd.
Now go to the Kata config file that matches your runtime class and enable every debug option available. You do not need to restart any daemons when changing the Kata config file; just run another pod or hope that Kubernetes restarts your existing pod. Note that enabling debug options in the Kata config file can change the attestation evidence of a confidential guest.
Now you should be able to view logs from containerd with the following:
sudo journalctl -xeu containerd
Kata writes many messages to this log. It’s good to know what you’re looking for. There are many generic messages that are insignificant, often arising from a VM not shutting down cleanly after an unrelated issue.
VM Doesn’t Start
If the VM has failed to start, you might have a problem with confidential computing support on your worker node. Make sure that you can start confidential VMs without confidential containers.
Check the containerd log for any obvious errors regarding VM boot.
Try searching the log for the string error or for the name
of your hypervisor i.e. qemu or qemu-system-x86_64.
If there are no obvious errors, try finding the hypervisor command line. This should be in the containerd log if you have enabled debug messages correctly.
It might be tempting to try running the hypervisor command directly from the command line, but this usually isn’t productive. Instead, try starting a standalone VM using the same kernel, initrd/disk, command line, firmware, and hypervisor that Kata uses. This might uncover some kind of system misconfiguration. You can also find these values in the Kata config file, but looking in the log is more direct.
Another way to print the hypervisor command is to create a bash script
that prints any arguments it is called with to a file. Then modify the
Kata config file so that the hypervisor path points to this script
rather than to the hypervisor. This method can also be used to add
additional parameters to the command line. Just have the bash script
call the hypervisor with whatever arguments it received plus any that
you want to add. This could be useful for enabling debugging or tracing
flags in your hypervisor. For instance, if you are using QEMU and SEV
you might want to add the argument --trace 'kvm_sev_*'. Make sure
that QEMU was built with an appropriate tracing backend.
VM Does Start
If the VM does start, search the containerd log for the string vmconsole.
This will show you any guest serial output. You might see some errors
coming from the kernel as the guest tries to boot. You might also see the
Kata agent starting. If the Kata agent has started, you can match
the output to the source to get some clues about what is happening.
You might also see something more obvious, like a panic coming from
the Kata agent.
Debug Console
One very useful debugging tool is the Kata guest debug console. You can enable this by editing the Kata agent configuration file and adding the lines
debug_console = true
debug_console_vport = 1026
Enabling the debug console via the Kata Configuration file will overwrite any settings in the agent configuration file in the guest initrd. Enabling the debug console will also change the launch measurement.
Once you’ve started a pod with the new configuration, get the id of the pod
you want to access. Do this via ps -ef | grep qemu or equivalent.
The id is the long id that shows up in many different arguments.
It should look like 1a9ab65be63b8b03dfd0c75036d27f0ed09eab38abb45337fea83acd3cd7bacd.
Once you have the id, you can use it to access the debug console.
sudo /opt/confidential-containers/bin/kata-runtime exec <id>
You might need to symlink the appropriate Kata configuration file for your runtime
class if the kata-runtime tries to look at the wrong one.
The debug console gives you access to the guest VM. This is a great way to investigate missing dependencies or incorrect configurations.
Guest Firmware Logs
If the VM is running but there is no guest output in the log,
the guest may have stalled in the firmware. Firmware output will
depend on your firmware and hypervisor. If you are using QEMU and OVMF,
you can see the OVMF output by adding -global isa-debugcon.iobase=0x402
and -debugcon file:/tmp/ovmf.log to the QEMU command line using the
redirect script described above.
Image Pulling
Pod creation fails with “error unpacking image”
Sometimes when creating a pod you might encounter the following error:
Warning Failed 8m51s (x7 over 10m) kubelet Error: failed to create containerd container: error unpacking image: failed to extract layer sha256:d51af96cf93e225825efd484ea457f867cb2b967f7415b9a3b7e65a2f803838a: failed to get reader from content store: content digest sha256:ec562eabd705d25bfea8c8d79e4610775e375524af00552fe871d3338261563c: not found
If you encounter this error, first check if the discard_unpacked_layers
setting is enabled in the containerd configuration. This setting removes
compressed image layers after unpacking, which can cause issues because
Confidential container workloads rely on those layers. To disable it, update
/etc/containerd/config.toml with:
[plugins."io.containerd.grpc.v1.cri".containerd]
  discard_unpacked_layers = false
Previously failed images needs to be prefetched
ctr -n k8s.io content fetch <image>
Restart containerd after making the change:
If on a remote, it will kill the connection.
sudo systemctl restart containerd
failed to create shim task: failed to mount “/run/kata-containers/shared/containers/CONTAINER_NAME/rootfs”
If your CoCo Pod gets an error like the one shown below, then it is likely the image pull policy is set to IfNotPresent, and the image has been found in the kubelet cache. It fails because the container runtime will not delegate to the Kata agent to pull the image inside the VM and the agent in turn will try to mount the bundle rootfs that only exist in the host filesystem.
Therefore, you must ensure that the image pull policy is set to Always for any CoCo pod. This way the images are always handled entirely by the agent inside the VM. It is worth mentioning we recognize that this behavior is sub-optimal, so the community provides solutions to avoid constant image downloads for each workload.
Events:
  Type     Reason     Age               From               Message
  ----     ------     ----              ----               -------
  Normal   Scheduled  20s               default-scheduler  Successfully assigned default/coco-fedora-69d9f84cd7-j597j to virtlab1012
  Normal   Pulled     5s (x3 over 19s)  kubelet            Container image "docker.io/wainersm/coco-fedora_sshd@sha256:a7108f9f0080c429beb66e2cf0abff143c9eb9c7cf4dcde3241bc56c938d33b9" already present on machine
  Normal   Created    5s (x3 over 19s)  kubelet            Created container coco-fedora
  Warning  Failed     5s (x3 over 19s)  kubelet            Error: failed to create containerd task: failed to create shim task: failed to mount "/run/kata-containers/shared/containers/coco-fedora/rootfs" to "/run/kata-containers/coco-fedora/rootfs", with error: ENOENT: No such file or directory: unknown
  Warning  BackOff    4s (x3 over 18s)  kubelet            Back-off restarting failed container
9 - Contributing
Getting started with contributions
So you want to contribute to Confidential Containers? This guide will get you up to speed on the mechanics of the project and offer tips about how to work with the community and make great contributions.
First off, Confidential Containers (CoCo) is an open source project. You probably already knew that, but it’s good to be clear that we welcome contributions, involvement, and insight from everyone. Just make sure to follow the code of conduct.
CoCo is licensed with Apache License, Version 2.0.
This guide won’t cover the architecture of the project, but you’ll notice that there are many different repositories under the CoCo organization. A CoCo deployment integrates many different components. Fortunately the process for contributing to each of these subprojects is largely the same. There is one major exception. Most CoCo deployments leverage Kata Containers, which is an existing open source project. Kata has its own Contributor Guide that you should take a look at. You can contribute to CoCo by contributing to Kata, but this guide is focused on contributions made to repositories in the CoCo organization.
Connecting with the Community
You might already know exactly what you want to contribute and how. If not, if would be useful to interact with existing developers. There are several easy ways to do this.
Slack Channel
The best place to interact with the CoCo community is the
#confidential-containers channel in the CNCF Slack workspace.
This is a great place to ask any questions about the project
and to float ideas for future development.
Community Meeting
CoCo also has a weekly community meeting on Thursdays. See the agenda for more information. The community meeting usually has a packed agenda, but there is always time for a few basic questions.
GitHub Issue
You can also open issues in GitHub. Try to open your issue on the repository that is most closely related to your question. If you aren’t sure which repository is most relevant, you can open an issue on this repository. If you’re creating an issue that you plan to resolve, consider noting this in a comment so other developers know that someone is working on the problem.
Making Contributions
The mechanics of making a contribution are straightforward. We follow a typical GitHub contribution flow. All contributions should be made as GitHub pull requests. Make sure your PR includes a Developer Certificate of Origin (DCO) and follow any existing stylistic or organizational conventions. These requirements are explained in more detail below.
Some contributions are simpler than others. If you are new to the community it could be good to start with a few simple contributions to get used to the process. Larger contributions, especially ones that span multiple subprojects, or have implications on the trust model or project architecture, will usually require more discussion and review. Nonetheless, CoCo has a track record of responding to PRs quickly and merging PRs quickly.
If you are preparing a large contribution, it is wise to share your idea
with the community as early as possible. Consider making an RFC issue
that explains the changes. You might also try to break large contributions
into smaller steps.
Making a Pull Request
If you aren’t familiar with Git or the GitHub PR workflow, take a look at this section of the Kata Containers contributor guide. We have a few firm formatting requirements that you must follow, but in general if you are thoughtful about your work and responsive to review, you shouldn’t have any issues getting your PRs merged. The requirements that we do have are there to make everyone’s life a little easier. Don’t worry if you forget to follow one of them at first. You can always update your PR if necessary. If you have any ideas for how we can improve our processes, please suggest them to the community or make PR to this document.
Certificate of Origin
Every PR in every subproject is required to include a DCO. This is strictly enforced by the CI. Fortunately, it’s easy to comply with this requirement. At the end of the commit message for each of your commits add something like
Signed-off-by: Alex Ample <al@example.com>
You can add additional tags to credit other developers who worked on a commit or helped with it. See here for more information.
Coding Style
Please follow whatever stylistic and organizational conventions have been established in the subproject that you are contributing to.
Most CoCo subprojects use Rust. When using Rust, it is a good idea to run rustfmt and clippy
before submitting a PR.
Most subprojects will automatically run these tools via a workflow,
but you can also run the tools locally.
In most cases your code will not be accepted if it does not pass these tests.
Projects might have additional conventions that are not captured by these tools.
- Use
rustfmtto fix any mechanical style issues. Rustfmt uses a style which conforms to the Rust Style Guide. - Use
clippyto catch common mistakes and improve your Rust code.
You can install the above tools as follows.
$ rustup component add rustfmt clippy
Commit Format
Along with code your contribution will include commit messages.
As mentioned, commit messages are required to have a Signed-off-by footer.
Commit messages should not be empty.
Even if the commit is self-explanatory to you, include a short description of
what it does.
This helps reviewers and future developers.
The title of the commit should start with a subsystem. For example,
docs: update contributor guide
The “subsystem” describes the area of the code that the change applies to. It does not have to match a particular directory name in the source tree because it is a “hint” to the reader. The subsystem is generally a single word.
If the commit touches many different subsystems, you might want to split it into multiple commits. In general more smaller commits are preferred to fewer larger ones.
If a commit fixes an existing GitHub issue, include Fixes: #xxx in the commit message.
This will help GitHub link the commit to the issue, which shows other developers that
work is in progress.
Pull Request Format
The pull request itself must also have a name and a description. Like a commit, the pull request name should start with a subsystem. Unlike a commit, the pull request description does not become part of the Git log. The PR description can be more verbose. You might include a checklist of development steps or questions that you would like reviewers to consider. You can tag particular users or link a PR to an issue or another PR. If your PR depends on other PRs, you should specify this in the description. In general, the more context you provide in the description, the easier it will be for reviewers.
Reviews
In most subprojects your PR must be approved by two maintainers before it is merged. Reviews are also welcome from non-maintainers. For information about community structure, including how to become a maintainer, please see the governance document.
It may take a few iterations to address concerns raised by maintainers and other reviewers. Keep an eye on GitHub to see if you need to rebase your PR during this process. The web UI will report whether a PR can be automatically merged or if it conflicts with the base branch.
While CoCo reviewers tend to be responsive, many have a lot on their plate. If your PR is awaiting review, you can tag a reviewer to remind them to take a look. You can also ask for review in the CoCo Slack channel.
Continuous Integration
All subprojects have some form of CI and require some checks to pass before a PR can be merged. Some of the checks are:
- Static analysis checks.
- Unit tests.
- Functional tests.
- Integration tests.
If your PR does not pass a check, try to find the cause of the failure. If the cause is not related to your changes, you can ask a reviewer to re-run the tests or help troubleshoot.
With this guide, you’re well-prepared to contribute effectively to Confidential Containers. We appreciate your involvement in our open-source community!